


NEST 2023 Question Paper with Answer Key pdf is available for download. The exam was conducted by NISER, Bhubaneshwar and UM-DAE CEBS, Mumbai on June 24, 2023 in the Session 1. In terms of difficulty level, NEST was of Easy to Moderate level. The question paper comprised a total of 68 questions.It includes four subject sections: Biology, Chemistry, Mathematics, and Physics, with a total of 200 marks
NEST 2023 Question Paper with Answer Key PDFs Session 1
| NEST 2023 Session 1 Question Paper with Answer Key | Check Solutions |

BIOLOGY
Question 1:
A cladogram representing the evolution of some animals (P, Q, R, and S) is shown. The features marked I to IV in the cladogram represent different features that have evolved. What is the correct statement with respect to the given cladogram?

View Solution
Step 1: Understanding the cladogram and the features represented by I to IV.
The general idea of a cladogram is to illustrate evolutionary relationships based on shared traits.
The first animal, P, could be a basic vertebrate, with simple features such as gills.
Moving along the tree, the branches represent the evolution of more complex traits.
As per the options, if Q is a bullfrog (an amphibian), R could be a koala (a marsupial), and S could be a human (a placental mammal).
Step 2: Analyzing the features.
Feature II: If feature II represents "two pairs of limbs," it would be a trait shared by both the bullfrog and the koala, which evolved after the common ancestor of the amphibians and mammals.
Conclusion:
Therefore, the correct option is (3), since Q (bullfrog), R (koala), and S (human) all share this trait, which would be two pairs of limbs, making feature II a key trait for that evolutionary stage. Quick Tip: In cladograms, use the branching points to identify when new features evolved, and consider how shared traits help in the classification of animals.
A 1000 base pair double-stranded DNA (B form) has a melting temperature (\( T_m \)) of 58°C. If a duplex RNA (A form) of the same length and sequence is constructed, then the \( T_m \) of this new RNA duplex with respect to the DNA (B form) would be:
View Solution
Step 1: Understanding the melting temperature (\(T_m\)) concept.
The melting temperature (\( T_m \)) of a duplex refers to the temperature at which half of the strands are dissociated into single strands. It is primarily dependent on the stability of the duplex. The more stable the duplex, the higher the \( T_m \).
Step 2: Comparing the stability of DNA and RNA duplexes.
DNA forms a double helix in the B-form, which is characterized by base pairing between adenine and thymine (A-T), and cytosine and guanine (C-G), linked by hydrogen bonds. RNA, on the other hand, forms an A-form helix, which is more compact and structurally stable compared to the B-form of DNA.
Step 3: Hydrogen bonding differences.
While both RNA and DNA duplexes involve base-pairing, the number and strength of hydrogen bonds play a key role in the stability. The RNA duplex typically forms stronger interactions due to its A-form structure, which provides greater stability than the B-form structure of DNA.
Step 4: Conclusion on \(T_m\).
Because the RNA A-form duplex is more stable than the DNA B-form duplex, the melting temperature of the RNA duplex (\( T_m \)) will be higher than that of the DNA duplex for the same sequence and length. Therefore, the correct answer is:
Correct Answer: (1) higher due to greater stability of A form of RNA duplex. Quick Tip: In comparing the melting temperatures of RNA and DNA duplexes: - The melting temperature depends on the stability of the duplex. - RNA typically forms more stable A-form duplexes compared to DNA's B-form, leading to a higher \( T_m \). - More stable duplexes (due to factors like stronger hydrogen bonding) result in higher melting temperatures.
A biochemist wants to purify a protein X (molecular weight = 30.2 kDa and pI = 7.5) from a solution containing proteins X and Y (molecular weight = 30.9 kDa and pI = 3.5) using ion exchange chromatography. In this technique, an anion exchange resin is positively charged and a cation exchange resin is negatively charged. The most appropriate resin where protein X, but not Y will remain bound is
View Solution
Step 1: Understanding Ion Exchange Chromatography.
Ion exchange chromatography separates proteins based on their net charge, which is determined by the pH of the buffer relative to the protein's isoelectric point (pI). Anion exchange resins are positively charged and bind negatively charged proteins, while cation exchange resins are negatively charged and bind positively charged proteins.
Step 2: Determining the charge of proteins X and Y at different pH values.
For Protein X (pI = 7.5):
At pH \(>\) 7.5, X has a net negative charge.
At pH \(<\) 7.5, X has a net positive charge.
At pH = 7.5, X has a net charge close to zero.
For Protein Y (pI = 3.5):
At pH \(>\) 3.5, Y has a net negative charge.
At pH \(<\) 3.5, Y has a net positive charge.
At pH = 3.5, Y has a net charge close to zero.
Step 3: Evaluating each option.
Option (1): Cation exchanger at pH = 7.5. At pH 7.5, protein X has a near-zero charge and will not bind strongly to a cation exchanger (negatively charged). Protein Y (pI = 3.5) will have a net negative charge (pH \(>\) pI) and will not bind to a cation exchanger.
Option (2): Anion exchanger at pH = 2.5. At pH 2.5, protein X (pI = 7.5) has a net positive charge (pH \(<\) pI) and will not bind to an anion exchanger (positively charged). Protein Y (pI = 3.5) will also have a net positive charge (pH \(<\) pI) and will not bind to an anion exchanger.
Option (3): Cation exchanger at pH = 5.0. At pH 5.0, protein X (pI = 7.5) has a net positive charge (pH \(<\) pI) and will bind to a cation exchanger (negatively charged). Protein Y (pI = 3.5) has a net negative charge (pH \(>\) pI) and will not bind to a cation exchanger.
Option (4): Anion exchanger at pH = 7.5. At pH 7.5, protein X has a near-zero charge and will not bind strongly to an anion exchanger (positively charged). Protein Y (pI = 3.5) has a net negative charge (pH > pI) and will bind to an anion exchanger.
Conclusion:
The most appropriate condition where protein X binds and protein Y does not is using a cation exchanger at pH = 5.0. Quick Tip: Remember the relationship between pH, pI, and protein charge: pH < pI (net positive charge), pH > pI (net negative charge), pH = pI (net zero charge). Also, cation exchangers bind positive charges, and anion exchangers bind negative charges.
Bacterial endospores are highly resistant to environmental stresses such as heat, UV radiation, and oxidizing agents. They can remain dormant for a prolonged period. During the period of dormancy, they prevent the accumulation of potentially harmful mutations in their DNA. This is primarily due to:
View Solution
Step 1: Understand the role of endospores.
Bacterial endospores are dormant, resistant structures formed by bacteria (e.g., Bacillus, Clostridium) to survive harsh conditions like heat, UV radiation, and oxidizing agents. During dormancy, they must protect their DNA from mutations caused by chemical or physical damage.
Step 2: Evaluate option (1) (decreased water content and reduced enzyme activity).
Endospores have extremely low water content due to dehydration during spore formation. They also exhibit minimal metabolic activity, including reduced enzyme activity. Low water content and enzyme activity minimize chemical reactions (e.g., hydrolysis, oxidation) that could damage DNA, thus preventing mutations. This option is plausible.
Step 3: Evaluate option (2) (decreased salt concentration and enhanced enzyme activity).
Endospores do not specifically decrease salt concentration as a protective mechanism. Additionally, enzyme activity is reduced, not enhanced, during dormancy. Enhanced enzyme activity would increase metabolic processes, potentially leading to DNA damage. This option is incorrect.
Step 4: Evaluate option (3) (decreased respiration and decreased DNA supercoiling).
Endospores do have decreased respiration (metabolism is nearly halted). However, DNA in endospores is stabilized by small acid-soluble proteins (SASPs) and often maintains supercoiling to protect it from damage. Decreasing DNA supercoiling would make DNA more vulnerable to damage, not less. This option is incorrect.
Step 5: Evaluate option (4) (increased enzyme activity and increased membrane permeability).
Endospores have reduced enzyme activity, not increased, to minimize metabolic processes. Their membrane permeability is also decreased due to a tough outer coat, not increased, to protect against environmental stress. This option is incorrect.
Step 6: Conclusion.
The primary reason endospores prevent DNA mutations during dormancy is their decreased water content and reduced enzyme activity, which minimizes DNA-damaging chemical reactions. Thus, the correct answer is (1). Quick Tip: When evaluating biological mechanisms in dormant structures like endospores: - Focus on protective strategies that minimize metabolic activity and chemical reactions (e.g., dehydration, reduced enzyme activity). - DNA protection often involves stabilization (e.g., supercoiling, binding proteins) rather than structural relaxation.
Pea seeds were allowed to germinate for 4 days, and segments of the epicotyl were treated with cyanide (CN\(^-\)) at a concentration of 0.1 mM. The membrane potential was recorded before and after the addition and removal of cyanide. The graph of cell membrane potential (mV) against time (minutes) is shown below. Based on these experimental observations, the correct option is:

View Solution
Step 1: Analyzing the graph of membrane potential against time.
Initially, the membrane potential is stable.
Upon the addition of cyanide, the membrane potential rapidly decreases, which suggests a disruption in the cell's metabolic processes, particularly those requiring ATP.
Step 2: Understanding the effect of cyanide.
Cyanide inhibits the electron transport chain in mitochondria, leading to a loss of ATP production. The depletion of ATP affects active transport processes across the membrane, such as the sodium-potassium pump, which is crucial for maintaining the membrane potential.
Conclusion:
Therefore, the correct option is (1), as cyanide decreases ATP production, leading to a decrease in membrane potential. Quick Tip: When analyzing membrane potential changes, consider the role of ATP-dependent ion pumps and the effects of inhibitors like cyanide.
In the given pedigree, circles represent females and squares represent males. Filled shapes indicate affected individuals while unfilled shapes indicate unaffected individuals. Based on the pedigree information provided, the correct inheritance pattern is:

Based on these results, the correct option is:
View Solution
To determine the inheritance pattern, observe the affected individuals in the pedigree. The key features of each inheritance pattern are as follows:
Autosomal Dominant: Affected individuals typically have at least one affected parent, and the disorder is seen in both males and females.
Autosomal Recessive: Affected individuals can have parents who are both carriers (heterozygous), and the disorder can skip generations.
X-linked Dominant: Affected fathers will pass the trait to all of their daughters, but none of their sons.
X-linked Recessive: Affected males will pass the trait to all of their daughters but not to their sons. Affected females are rare.
In the provided pedigree, the pattern suggests an autosomal recessive inheritance, as affected individuals are seen in a generation where both parents are unaffected and appear to carry the gene. Quick Tip: To analyze pedigrees: - Autosomal dominant traits are observed in every generation. - Autosomal recessive traits tend to skip generations, with carriers being unaffected. - X-linked inheritance shows distinct patterns between males and females.
A population has a single locus with three alleles (X1, X2, X3). The frequencies of these alleles are \( p \), \( q \), and \( r \), respectively, and if \( p + q + r = 1 \), then the correct statement is:
View Solution
Step 1: Understand Hardy-Weinberg equilibrium for multiple alleles.
For a locus with three alleles (X1, X2, X3) with frequencies \( p \), \( q \), and \( r \), Hardy-Weinberg equilibrium (HWE) predicts genotype frequencies based on allele frequencies.
Expected genotype frequencies are: homozygotes \( p^2 \), \( q^2 \), \( r^2 \); heterozygotes \( 2pq \), \( 2pr \), \( 2qr \). HWE assumes random mating, no selection, no mutation, no migration, and a large population.
Step 2: Analyze the given information.
We are given allele frequencies \( p \), \( q \), \( r \) with \( p + q + r = 1 \), but no genotype frequencies or population conditions (e.g., random mating) are provided.
To confirm HWE, we need observed genotype frequencies to compare with expected frequencies, which are missing here.
Conclusion:
Therefore, the correct option is (3), as the information provided is insufficient to determine whether the population is in Hardy-Weinberg equilibrium. Quick Tip: For Hardy-Weinberg equilibrium problems, ensure you have sufficient data:
- Allele frequencies alone cannot confirm HWE.
- Check for observed genotype frequencies and HWE assumptions (e.g., random mating).
Mendelian theory of inheritance was crucial for Darwin-Wallace's theory of natural selection because
[0.5cm]
View Solution
Step 1: Understanding Darwin-Wallace Theory of Natural Selection.
The Darwin-Wallace theory of natural selection posits that organisms with heritable traits better suited to their environment are more likely to survive and reproduce. This leads to a gradual change in the characteristics of a population over time.
Step 2: Identifying a key challenge for Darwin's initial theory.
A significant challenge for Darwin's original theory was the understanding of inheritance. The prevailing idea of "blending inheritance" suggested that offspring traits were a uniform blend of their parents' traits. This would imply that any new variation would be diluted and eventually disappear over generations, making it difficult for natural selection to act upon and lead to significant evolutionary change.
Step 3: Understanding Mendelian Genetics.
Mendelian genetics, with its principles of particulate inheritance (genes as discrete units), segregation (alleles separate during gamete formation), and independent assortment (alleles of different genes assort independently), provided a mechanism for how variations could be maintained and passed on without blending. Rare but advantageous alleles could persist in a population, even at low frequencies, and could become more common over time if they conferred a selective advantage.
Step 4: Evaluating the options.
- Option (1): This option correctly states that Mendelian theory explained the persistence of new variations despite low frequency. This was crucial because it showed that the raw material for natural selection (heritable variation) wouldn't simply disappear.
Option (2): This option refers to the inheritance of acquired characteristics, a Lamarckian idea that was rejected by both Darwinism and Mendelian genetics. Mendelian inheritance focuses on traits passed down through genes from parents to offspring.
Option (3): While Mendelian genetics does explain how variation is transmitted, the crucial aspect for Darwin's theory was the persistence of this variation, not just its appearance. Darwin already observed variation; the problem was explaining its maintenance.
Option (4): Linkage, the tendency of genes located close together on a chromosome to be inherited together, is a part of Mendelian inheritance but was not the primary reason it was crucial for Darwin's theory. The persistence of individual variations was the key contribution.
Conclusion:
Mendelian theory was crucial for Darwin-Wallace's theory of natural selection because it provided the mechanism for the maintenance of heritable variation within populations, allowing natural selection to act upon these persistent variations over time. Quick Tip: Remember that Darwin's theory lacked a clear mechanism for inheritance. Mendel's work provided that mechanism, explaining how genetic variation could be maintained and not lost through blending.
In a closed ecosystem, red algae, crabs, and green algae interact with each other. The following experimental treatments were imposed:
[i.] All crabs removed
[ii.] All green algae removed
[iii.] All crabs and green algae removed
[iv.] All crabs, red, and green algae are retained (Control)
The results of red algae growth from these experiments are shown in the graph. Plus (+) indicates presence and minus (-) indicates absence. Red algae growth in all the treatments was significantly different from each other.

Based on these results, the correct option is:
View Solution
Step 1: Analyzing the graph and experimental conditions.
The graph indicates that red algae growth varies across treatments. When both crabs and green algae are removed, the red algae growth is higher compared to when both are present. This suggests that the crabs might have a negative impact on the algae growth, especially in the presence of green algae.
Step 2: Interpreting the results.
In the absence of green algae, crabs seem to negatively affect red algae growth, as indicated by the lower growth in the presence of crabs.
When green algae are present, the interaction between the crabs and red algae leads to a decrease in red algae growth.
Conclusion:
The correct option is (3), as crabs negatively impact red algae growth, especially when green algae are absent. Quick Tip: Interactions in ecosystems can be complex. When analyzing graphs, observe how removing or adding species impacts the growth of others.
Synthesis of ATP takes place when protons flow back to the matrix side through an enzyme complex called ATP synthase. ATP synthase is made up of two operational units: a rotatory and a stationary component. Assume that the ATP synthase does \(\sim 100\) rotations per second, and each rotation results in the generation of 3 ATP molecules. Suppose that a cell needs \(\sim 3 \times 10^{10}\) molecules of ATP for one round of cell division that takes 30 minutes with the ATP synthase functioning at 50% efficiency. The minimum number of ATP synthase required for one round of cell division in this cell is:
View Solution
We are given the following data:
Number of ATP molecules needed for one round of cell division: \( 3 \times 10^{10} \)
ATP synthase efficiency: 50%
Time for cell division: 30 minutes (which is \( 30 \times 60 = 1800 \) seconds)
Number of ATP molecules generated per rotation: 3 ATP
Step 1: Total number of rotations needed.
Each ATP synthase does 100 rotations per second and generates 3 ATP molecules per rotation.
Thus, in 1800 seconds, the total number of ATP molecules generated by one ATP synthase is:
\[ Total ATP generated = 100 \times 3 \times 1800 = 540,000 \, ATP molecules per ATP synthase. \]
Step 2: Adjusting for efficiency.
The ATP synthase operates at 50% efficiency, so the actual number of ATP molecules generated is halved: \[ Effective ATP generated = \frac{540,000}{2} = 270,000 \, ATP molecules per ATP synthase. \]
Step 3: Calculating the number of ATP synthase required.
We need \( 3 \times 10^{10} \) ATP molecules for cell division. The number of ATP synthase required is: \[ Number of ATP synthase = \frac{3 \times 10^{10}}{270,000} = 111111 \, ATP synthase. \]
Therefore, the correct answer is: \[ \boxed{111111}. \] Quick Tip: When calculating the number of ATP synthase required: - First, determine how many ATP molecules one ATP synthase can generate in the given time. - Adjust for the efficiency of the ATP synthase. - Finally, divide the total ATP requirement by the effective ATP production rate to determine the number of ATP synthase molecules needed.
The permeability of molecules across a lipid bilayer depends on their size and solubility in a nonpolar solvent relative to their solubility in water. For the species \( O_2, H_2O, K^+, glycerol \) and \( glucose \), the order of their permeability across a lipid bilayer in the absence of any protein transporters is
View Solution
Step 1: Understanding Permeability Across a Lipid Bilayer.
The lipid bilayer of cell membranes has a hydrophobic interior and hydrophilic surfaces. Therefore, molecules that are small and nonpolar (lipophilic) can easily pass through the membrane by simple diffusion. Larger and polar (hydrophilic) molecules face greater difficulty crossing the hydrophobic core.
Step 2: Analyzing the Properties of Each Molecule.
Let's consider the size and polarity of each molecule:
\( O_2 \) (Oxygen): Small and nonpolar. It should have high permeability.
\( H_2O \) (Water): Small but polar. Its small size allows some permeability, but it's less permeable than nonpolar molecules.
\( K^+ \) (Potassium ion): Small but carries a charge, making it highly polar and strongly interacting with water. It will have very low permeability across the hydrophobic core.
Glycerol: A small molecule with three hydroxyl (-OH) groups, making it polar. Its permeability will be lower than that of nonpolar molecules and smaller polar molecules like water.
Glucose: A larger molecule with multiple hydroxyl (-OH) groups, making it quite polar and also relatively large. It will have very low permeability.
Step 3: Ordering the Molecules Based on Permeability.
Based on the analysis above, the expected order of permeability from highest to lowest is:
1. Small, nonpolar: \( O_2 \)
2. Small, slightly polar: \( H_2O \)
3. Small, more polar: Glycerol
4. Larger, polar: Glucose
5. Charged ion: \( K^+ \)
This gives the order: \( O_2 > H_2O > Glycerol > Glucose > K^+ \).
Step 4: Comparing with the Options.
Option (1) matches our predicted order of permeability.
Conclusion:
The correct order of permeability across a lipid bilayer in the absence of protein transporters is \( O_2 > H_2O > Glycerol > Glucose > K^+ \). Quick Tip: Remember the "like dissolves like" principle. The hydrophobic interior of the lipid bilayer favors the passage of nonpolar molecules. Smaller molecules generally permeate more easily than larger ones. Charged molecules have the most difficulty crossing due to their strong interactions with water and the energy barrier of the hydrophobic core.
A monoclonal (antibody specific for a given epitope of an antigen) IgG antibody (M) was produced in the laboratory that binds a surface protein (P) of a virus (V1) and neutralizes 100% of V1. It was observed that M is also effective in neutralizing other viruses V2, V3 and V4 at 40%, 90% and 32% efficiency as compared to V1. If there are no other confounding factors, then the most accurate inference is:
View Solution
Step 1: Analyze the neutralization efficiencies.
The antibody M neutralizes V1 at 100% and V3 at 90%, indicating high similarity in the epitope on protein P between V1 and V3.
For V2 (40%) and V4 (32%), the lower efficiencies suggest that the epitope on P is less similar to V1’s, implying greater divergence.
Step 2: Evaluate the options based on epitope conservation.
Option (1): If protein P were identical across all viruses, neutralization efficiencies would be the same (100%). The variation (100%, 40%, 90%, 32%) rules this out.
Option (2): Neutralization depends on the epitope on P, not overall genome similarity. Genome identity doesn’t explain the observed efficiencies.
Option (3): V2 and V4 have similar efficiencies (40%, 32%), but this doesn’t directly imply their P sequences are more similar to each other than V1 and V2 are. This is less directly supported by the data.
Option (4): High efficiencies for V1 and V3 (100%, 90%) suggest a conserved epitope on P, while lower efficiencies for V2 and V4 (40%, 32%) suggest less conservation of this epitope, which aligns with the data.
Conclusion:
Therefore, the correct option is (4), as the neutralization efficiencies indicate that a segment of protein P is highly conserved in V1 and V3 but less conserved in V2 and V4. Quick Tip: When analyzing antibody neutralization efficiencies, consider the role of epitope conservation:
- High neutralization efficiency suggests a conserved epitope.
- Variations in efficiency indicate differences in the epitope sequence or structure.
A genetic engineering experiment resulted in a new haemoglobin variant which exists primarily as \(\alpha \beta\) dimers in solution. Based on the oxygen saturation curves of the variant (dashed line) and normal haemoglobin (solid line), it can be inferred that:

View Solution
The oxygen saturation curve of the haemoglobin variant (represented by the dashed line) is significantly shifted to the left compared to the normal haemoglobin (solid line). This indicates that the variant has a higher affinity for oxygen because it binds oxygen more readily at lower partial pressures. The steepness of the curve and the absence of the sigmoidal shape further suggest that the variant does not show cooperative binding, as the typical cooperative binding seen in normal haemoglobin results in a more gradual curve.
Thus, the correct interpretation is that the haemoglobin variant has a higher affinity for oxygen and shows non-cooperative behaviour.
Therefore, the correct answer is: \[ \boxed{(1) \, the variant has a higher affinity to oxygen and shows non-cooperative behaviour.} \] Quick Tip: When analyzing oxygen saturation curves: - A leftward shift indicates a higher affinity for oxygen. - A steep, non-sigmoidal curve suggests non-cooperative binding, whereas a gradual curve indicates cooperative binding.
A hospital witnessed an outbreak of a nosocomial (hospital-acquired) infection caused by Klebsiella pneumoniae. It showed resistance to antibiotics generally used for its treatment. Under the given scenario, the antibiotic resistance of this organism can be attributed to:
View Solution
Step 1: Understanding the scenario.
The organism \textit{Klebsiella pneumoniae is a well-known pathogen in hospital settings, and its resistance to antibiotics is a major concern. The spread of antibiotic resistance genes in hospital environments is common due to the high usage of antibiotics.
Step 2: Analyzing the options.
Horizontal gene transfer is a major mechanism by which bacteria acquire resistance to antibiotics. This occurs when a bacterium takes up resistance genes from other bacteria, especially in environments like hospitals where bacteria are exposed to antibiotics regularly.
Silent mutations (Option 2) typically do not result in antibiotic resistance.
Neutralization by enzymes (Option 3) is another mechanism, but in this case, horizontal gene transfer is more likely.
Reduced permeability (Option 4) could contribute to resistance, but horizontal transfer of resistance genes is the most common cause in hospital-acquired infections.
Conclusion:
Therefore, the correct option is (1), as the spread of antibiotic resistance genes through horizontal transfer is the most common cause of antibiotic resistance in hospital settings. Quick Tip: In hospital settings, antibiotic resistance is often due to horizontal gene transfer between bacteria, especially when antibiotics are used extensively.
In the ABC model, the acquisition of floral organ identity is regulated by the floral homeotic genes named A, B, and C. A wild-type flower is depicted below.

Consider the following mutants:
[i.] loss of gene C
[ii.] loss of gene A
[iii.] loss of gene B
[iv.] loss of genes B and C
Possible floral phenotypes (P-S) resulting from these mutations are given below.

Based on this ABC model, the correct option(s) is(are):
View Solution
Step 1: Analyzing the ABC model of floral organ identity.
The ABC model proposes that floral organ identity is determined by the expression of three classes of genes: A, B, and C.
Gene A promotes sepal formation.
Gene B promotes petal and stamen formation.
Gene C promotes carpel formation.
Step 2: Analyzing the mutations and corresponding phenotypes.
(i) Loss of gene C results in the absence of carpel formation and the development of other organs in its place, which corresponds to phenotype R.
(iv) Loss of genes B and C would result in only sepals and carpels, corresponding to phenotype Q.
(ii) Loss of gene A leads to the loss of sepals and changes the arrangement of remaining floral organs, corresponding to phenotype P.
(iii) Loss of gene B results in the loss of petals and stamens, which corresponds to phenotype S.
Conclusion:
Therefore, the correct options are (1) and (3), as (i) corresponds to phenotype R and (iv) corresponds to phenotype Q, and (ii) corresponds to phenotype P while (iii) corresponds to phenotype S. Quick Tip: In the ABC model, the loss of specific genes can significantly alter floral organ formation. Understanding the roles of A, B, and C genes helps predict the resulting phenotypes.
Auxotrophs are organisms with mutations that have lost the ability to synthesise essential organic compounds, and hence need supplements for growth in minimal media. Prototrophs are organisms that are able to synthesize essential compounds and hence can grow in minimal media without supplements. Colonies from six different strains of E. coli (\textbf{U, V, W, X, Y, Z}) are grown separately on a single master plate containing complete medium. No strain carries more than a single auxotrophic mutation. Replica plates are then made from this master plate. Each of this replica plate contains minimal medium to which a single supplement (either \textbf{P, Q, R,} or \textbf{S}) is added. In the diagram below, filled circles represent colonies that grew on the medium and absence denotes failure to grow.

Based on the scheme, the correct interpretation(s) is(are):
\textbf{Correct Answer:} (2) strain Z is auxotrophic for R and strain Y is auxotrophic for S.
View Solution
In the provided diagram:
Strain W: Grows on minimal media with all supplements (P, Q, R, and S), indicating it is a prototrophic strain, meaning it can synthesize all the necessary compounds.
Strain V: Fails to grow on minimal media with P, but grows with Q, R, and S, indicating it is auxotrophic for Q and requires an external supply of Q.
Strain Z: Fails to grow on minimal media with R, indicating it is auxotrophic for R and requires an external supply of R.
Strain Y: Fails to grow on minimal media with S, indicating it is auxotrophic for S and requires an external supply of S.
Therefore, the correct interpretations are: \[ \boxed{(1) \, strain W is a prototrophic strain and strain V is auxotrophic for Q.} \] \[ \boxed{(2) \, strain Z is auxotrophic for R and strain Y is auxotrophic for S.} \] Quick Tip: To determine auxotrophy and prototrophy: - Prototrophic strains grow on minimal media without supplements, indicating they can synthesize all required compounds. - Auxotrophic strains fail to grow on minimal media unless supplemented with a specific compound that they can no longer synthesize due to mutations.
Energy diagrams allow ecologists to compare patterns of energy flow through the trophic levels of different ecosystems while biomass diagrams allow them to compare the amount of material present in living organisms at different trophic levels. The energy flow and biomass diagrams for a few ecosystems are given.

Choose the correct statement(s):
View Solution
Step 1: Understand the diagrams.
Energy flow pyramids (I A, II A, III A) show energy transfer (calories/m²/day) between trophic levels, decreasing upward due to the 10% rule. Biomass pyramids (I B, II B, III B) show biomass (grams/m²) at each level, typically decreasing upward, but can be inverted in open oceans due to rapid turnover of primary producers.
Step 2: Analyze the diagrams.
I A (Energy Flow): Narrow base (primary producers), wider middle (primary consumers), small top (secondary consumers). This suggests low consumable energy at the base, typical of a forest where much biomass (wood) is unavailable to herbivores.
I B (Biomass): Wide base (primary producers), smaller middle (primary consumers), tiny top (secondary consumers). This matches a forest ecosystem (e.g., trees dominate biomass).
II A (Energy Flow): Wide base, smaller middle, small top. This is a typical energy pyramid, likely a grassland where grasses are efficiently consumed by herbivores.
II B (Biomass): Wide base, smaller middle, small top. This matches a grassland (e.g., grasses dominate biomass).
III A (Energy Flow): Very wide base, much smaller middle, tiny top. This indicates high energy input with rapid turnover, typical of an open ocean (phytoplankton fix a lot of energy).
III B (Biomass): Inverted pyramid—small base (primary producers), larger middle (primary consumers), small top (secondary consumers). This is characteristic of an open ocean (phytoplankton have low biomass but high turnover).
Step 3: Evaluate option (1) (III B cannot be the biomass pyramid of an open ocean).
III B shows an inverted biomass pyramid, which is typical for an open ocean where phytoplankton (primary producers) have low biomass but high turnover, while primary consumers (zooplankton) accumulate more biomass. This statement is incorrect.
Step 4: Evaluate option (2) (I B and II B are the biomass pyramids of a grassland and a forest ecosystem respectively).
I B (wide base) matches a forest (trees dominate biomass), and II B matches a grassland (grasses dominate). However, the assignment is reversed—I B is a forest, and II B is a grassland. Additionally, while grasslands have more consumable biomass (green parts), the energy transfer efficiency is not necessarily higher; forests have lower transfer due to wood. This statement is incorrect.
Step 5: Evaluate option (3) (III A could be the energy flow pyramid for an open ocean).
III A’s very wide base and rapid drop-off match an open ocean, where phytoplankton fix a lot of energy but transfer little to higher levels due to rapid turnover. This statement is correct.
Step 6: Evaluate option (4) (I A could be the energy flow pyramid for a forest ecosystem).
I A’s narrow base and wider middle suggest low consumable energy at the producer level, typical of a forest where most biomass (wood) is unavailable to herbivores. This statement is correct. Quick Tip: When interpreting ecological pyramids: - Energy flow pyramids always decrease upward (10% rule applies). - Biomass pyramids are upright in forests and grasslands but can be inverted in open oceans due to rapid producer turnover. - Forests have low energy transfer to herbivores due to non-consumable biomass (wood).
CHEMISTRY
Question 18:
Pyrophosphoric acid (H\textsubscript{4}P\textsubscript{2}O\textsubscript{7}) and pyrophosphorous acid (H\textsubscript{4}P\textsubscript{2}O\textsubscript{5}) are oxyacids of phosphorus. The number of P--OH bonds present in pyrophosphoric acid and pyrophosphorous acid, respectively, are:
View Solution
Step 1: Understanding the structure of pyrophosphoric acid (H\(_4\)P\(_2\)O\(_7\)).
Pyrophosphoric acid consists of two phosphate groups (P--O--P) connected by an oxygen atom. Each phosphate group is attached to hydroxyl groups (--OH), forming P--OH bonds.
There are 4 P--OH bonds in pyrophosphoric acid because each of the two phosphorus atoms is bonded to two hydroxyl groups.
Step 2: Understanding the structure of pyrophosphorous acid (H\(_4\)P\(_2\)O\(_5\)).
Pyrophosphorous acid also consists of two phosphorus atoms, but the bonding differs from pyrophosphoric acid.
In this molecule, each phosphorus is bonded to one hydroxyl group, leading to only 2 P--OH bonds in total.
Step 3: Conclusion.
Pyrophosphoric acid has 4 P--OH bonds, while pyrophosphorous acid has 2 P--OH bonds.
Therefore, the correct answer is option (3): 4, 2. Quick Tip: When counting the P–OH bonds in oxyacids, carefully analyze the structure and identify the number of hydroxyl groups attached to the phosphorus atoms.
The pair of molecules having the same shape is:
View Solution
Step 1: Understanding the shape of PF\(_5\) and BrF\(_5\).
PF\(_5\) has a trigonal bipyramidal shape (5 bonding pairs, 0 lone pairs).
BrF\(_5\), however, has a square pyramidal shape (5 bonding pairs, 1 lone pair).
\textit{Thus, their shapes are not the same.
Step 2: Understanding the shape of O\(_3\) and I\(_3^-\).
O\(_3\) (ozone) has a bent shape due to lone pairs on the central oxygen.
I\(_3^-\) has a linear shape due to the lone pairs on the central iodine atom.
\textit{Thus, their shapes differ.
Step 3: Understanding the shape of BF\(_3\) and ClF\(_3\).
BF\(_3\) has a trigonal planar shape (3 bonding pairs, 0 lone pairs).
ClF\(_3\) has a T-shaped geometry (3 bonding pairs, 2 lone pairs).
\textit{Hence, their shapes are not the same.
Step 4: Understanding the shape of XeO\(_3\) and PF\(_3\).
XeO\(_3\) has a trigonal pyramidal shape (3 bonding pairs, 1 lone pair on xenon).
PF\(_3\) also has a trigonal pyramidal shape (3 bonding pairs, 1 lone pair on phosphorus).
\textit{Thus, both have the same shape.
Step 5: Conclusion.
The pair of molecules with the same shape are XeO\(_3\) and PF\(_3\), both trigonal pyramidal. Quick Tip: When determining the shape of a molecule, use VSEPR theory to analyze the number of bonding pairs and lone pairs on the central atom.
Boron on reaction with fluorine forms P, which on reaction with NaH at a high temperature produces Q along with a sodium salt. P on reaction with NH\(_3\) in 1:1 ratio gives R. Q on reaction with NH\(_3\) in 1:2 ratio at an elevated temperature gives S. The correct statement is:
View Solution
From the reactions described, compound Q is likely boron trifluoride (BF\(_3\)), which is a Lewis acid. When BF\(_3\) is dissolved in water, it hydrolyzes to form boric acid, H\(_3\)BO\(_3\), indicating that Q is an acid in water.
Therefore, the correct answer is: \[ \boxed{(4) \, Compound Q when dissolved in water gives an acid.} \] Quick Tip: When analyzing compounds of boron, note that boron trifluoride (BF\(_3\)) is a Lewis acid and forms boric acid when dissolved in water.
Among the following graphs, the one that represents the correct trend in the third ionization energy of lanthanum and the lanthanides is:
- (1)
![]()
- (2)
![]()
- (3)
![]()
- (4)
![]()


View Solution
Step 1: Understand the third ionization energy (IE\(_3\)).
The third ionization energy (IE\(_3\)) is the energy required to remove the third electron: \[ \mathrm{M^{2+} \rightarrow M^{3+} + e^-}. \]
For lanthanum (La, atomic number 57) and the lanthanides (Ce to Lu, atomic numbers 58–71), we need to examine their electron configurations and determine the orbitals from which the third electron is removed.
Step 2: Determine the electron configurations and IE\(_3\) trend.
La (57): [Xe] 5d\(^1\) 6s\(^2\) \(\rightarrow\) La\(^{2+}\): [Xe] 5d\(^1\)
The third electron is removed from the 5d orbital.
Lanthanides: Generally have configuration [Xe] 4f\(^n\) 5d\(^1\) 6s\(^2\) \(\rightarrow\) M\(^{2+}\): [Xe] 4f\(^n\)
The third electron is removed from the 4f orbital, forming a stable M\(^{3+}\) ion.
For example, Ce (58): [Xe] 4f\(^1\) 5d\(^1\) 6s\(^2\) \(\rightarrow\) Ce\(^{3+}\): [Xe] 4f\(^1\)
Exceptions:
Gd (64): [Xe] 4f\(^7\) 5d\(^1\) 6s\(^2\) \(\rightarrow\) Gd\(^{2+}\): [Xe] 4f\(^7\) 5d\(^1\) \(\rightarrow\) Gd\(^{3+}\): [Xe] 4f\(^7\)
The third electron is removed from the 5d orbital because 4f\(^7\) is a half-filled stable configuration.
Lu (71): [Xe] 4f\(^14\) 5d\(^1\) 6s\(^2\) \(\rightarrow\) Lu\(^{2+}\): [Xe] 4f\(^14\) 5d\(^1\) \(\rightarrow\) Lu\(^{3+}\): [Xe] 4f\(^14\)
The third electron is removed from the 5d orbital because 4f\(^14\) is a fully filled stable configuration.
Across the lanthanides, IE\(_3\) generally increases slightly due to the lanthanide contraction (increasing effective nuclear charge). However, noticeable dips occur at Gd (64) and Lu (71), where the third electron is removed from a 5d orbital, which is easier to remove than a 4f electron.
Step 3: Analyze the graphs.
(1) : Dips at 60, 66, and 71. Incorrect, as dips should be at 64 (Gd) and 71 (Lu).
(2) : Dips at 60, 66, and 71. Incorrect, same as above.
(3) : Slight rise from 57 to 63, dip at 64 (Gd), rise to 70, dip at 71 (Lu). This matches the expected trend.
(4) : Dips at 60, 66, and 71. Incorrect, same as (1).
Step 4: Conclusion.
The correct trend shows a slight increase in IE3 across the lanthanides, with dips at Gd (64) and Lu (71) due to removal from the 5d orbital. Graph (3) 4146644547 represents this trend accurately. Quick Tip: When analyzing ionization energy trends in the lanthanides: - Expect a slight increase due to the lanthanide contraction (increasing effective nuclear charge). - Look for dips when electrons are removed from less tightly bound orbitals (e.g., 5d instead of 4f). - Consider electron configuration exceptions (e.g., half-filled or fully filled 4f orbitals).
The ground state electronic energy of He atom (\( E_{He} \)) can be expressed in terms of the ground state energy of the hydrogen atom (\( E_H \)) and the electron-electron interaction energy (\( E_{ee} \)) in the He atom. If \( E_{ee} \) is equal to \( x \) times the magnitude of \( E_H \), then \( E_{He} \) is given by:
View Solution
The ground state energy of the He atom can be derived by considering both the hydrogen atom energy and the additional electron-electron interaction energy. Since the ground state energy of hydrogen is \( E_H \), and the interaction energy is proportional to \( x \), the total energy of the He atom is given by the sum of these contributions. Therefore, the correct expression is: \[ E_{He} = 8E_H + xE_H \]
This is based on the quantum mechanical treatment of the He atom, where the total energy includes the binding energies of both electrons and the electron-electron repulsion.
Therefore, the correct answer is: \[ \boxed{(4) \, E_{He} = 8E_H + xE_H} \] Quick Tip: When calculating the ground state energy of multi-electron atoms, consider both the individual electron energies and the electron-electron repulsion.
Consider a metal crystal with simple cubic, fcc, and bcc structures. Assume that the nearest neighbour atoms (spheres) touch each other in the unit cells. The correct statement is
View Solution
Step 1: Calculating the Packing Efficiency for Each Crystal Structure.
The packing efficiency (PE) is the fraction of the unit cell volume occupied by atoms. The void space is \( 1 - PE \). We need to calculate the PE for simple cubic (SC), body-centered cubic (BCC), and face-centered cubic (FCC) structures, assuming nearest neighbors touch.
Step 2: Simple Cubic (SC).
Number of atoms per unit cell = \( 8 \times \frac{1}{8} = 1 \).
Relationship between atomic radius (r) and lattice parameter (a): \( a = 2r \).
Volume of atoms in the unit cell = \( 1 \times \frac{4}{3} \pi r^3 \).
Volume of the unit cell = \( a^3 = (2r)^3 = 8r^3 \).
Packing Efficiency (PE) = \( \frac{\frac{4}{3} \pi r^3}{8r^3} = \frac{\pi}{6} \approx 0.52 \).
Percentage void space = \( (1 - 0.52) \times 100% = 48% \).
Step 3: Body-Centered Cubic (BCC).
Number of atoms per unit cell = \( 8 \times \frac{1}{8} + 1 = 2 \).
Relationship between r and a: \( 4r = a\sqrt{3} \Rightarrow a = \frac{4r}{\sqrt{3}} \).
Volume of atoms in the unit cell = \( 2 \times \frac{4}{3} \pi r^3 = \frac{8}{3} \pi r^3 \).
Volume of the unit cell = \( a^3 = \left(\frac{4r}{\sqrt{3}}\right)^3 = \frac{64r^3}{3\sqrt{3}} \).
Packing Efficiency (PE) = \( \frac{\frac{8}{3} \pi r^3}{\frac{64r^3}{3\sqrt{3}}} = \frac{8\pi \sqrt{3}}{64} = \frac{\pi \sqrt{3}}{8} \approx 0.68 \).
Percentage void space = \( (1 - 0.68) \times 100% = 32% \).
Step 4: Face-Centered Cubic (FCC).
Number of atoms per unit cell = \( 8 \times \frac{1}{8} + 6 \times \frac{1}{2} = 4 \).
Relationship between r and a: \( 4r = a\sqrt{2} \Rightarrow a = \frac{4r}{\sqrt{2}} = 2\sqrt{2}r \).
Volume of atoms in the unit cell = \( 4 \times \frac{4}{3} \pi r^3 = \frac{16}{3} \pi r^3 \).
Volume of the unit cell = \( a^3 = (2\sqrt{2}r)^3 = 16\sqrt{2}r^3 \).
Packing Efficiency (PE) = \( \frac{\frac{16}{3} \pi r^3}{16\sqrt{2}r^3} = \frac{\pi}{3\sqrt{2}} \approx 0.74 \).
Percentage void space = \( (1 - 0.74) \times 100% = 26% \).
Step 5: Comparing Void Spaces and Evaluating Options.
The percentage void spaces are:
FCC: 26%
BCC: 32%
Simple Cubic: 48%
The order of void space is fcc < bcc < simple cubic, which matches option (1).
Option (2) is incorrect as the number of atoms are 4, 2, and 1 for fcc, bcc, and simple cubic, respectively.
Option (3) is incorrect as the lowest percentage of void space is 26% (for FCC).
Option (4) is incorrect because the percentage of void space for these ideal structures is fixed and does not depend on the specific lattice parameter as long as the nearest neighbors touch.
Conclusion:
The correct statement is that the percentage of the void space in different crystal structures follows the order: fcc < bcc < simple cubic. Quick Tip: Remember the packing efficiencies for common crystal structures: Simple Cubic (\(\sim\)52%), BCC (\(\sim\)68%), FCC (\(\sim\)74%). The void space is simply 100% minus the packing efficiency percentage.
A certain amount (\( n \) moles) of a monoatomic ideal gas changes from an initial state \( X(P_1, V_1, T_1) \) to a final state \( Y(P_2, V_2, T_2) \). Let \( \Delta U \), \( \Delta H \), and \( \Delta S \) represent the changes in internal energy, enthalpy, and entropy, respectively in this process. The correct expression is:
View Solution
Step 1: Determine the change in internal energy (\( \Delta U \)).
For a monoatomic ideal gas, internal energy depends only on temperature. With degrees of freedom \( f = 3 \), \( U = \frac{3}{2} nRT \). The change in internal energy is: \[ \Delta U = U_2 - U_1 = \frac{3}{2} nR T_2 - \frac{3}{2} nR T_1 = \frac{3}{2} nR (T_2 - T_1) \]
Since \( \Delta U \) is a state function, it depends only on temperature, not pressure or volume. Options (1) and (2) don’t match this form directly, so we focus on \( \Delta H \) and \( \Delta S \).
Step 2: Determine the change in enthalpy (\( \Delta H \)).
Enthalpy is \( H = U + PV \). For an ideal gas, \( PV = nRT \), so: \[ H = \frac{3}{2} nRT + nRT = \frac{5}{2} nRT \]
The change in enthalpy is: \[ \Delta H = H_2 - H_1 = \frac{5}{2} nR T_2 - \frac{5}{2} nR T_1 = \frac{5}{2} nR (T_2 - T_1) \]
Option (1): \( \Delta H = \Delta U + P_2 (V_2 - V_1) \). This applies to constant pressure processes, but the process isn’t specified. Substituting \( \Delta U \) and \( P_2 (V_2 - V_1) = nR T_2 - P_2 V_1 \), this doesn’t match \( \frac{5}{2} nR (T_2 - T_1) \). Incorrect.
Option (2): \( \Delta H = \Delta U + P_2 (V_2 - V_1) + V_2 (P_2 - P_1) \). This doesn’t simplify to the correct form either. Incorrect.
Step 3: Determine the change in entropy (\( \Delta S \)).
Entropy change for an ideal gas is a state function. The standard expression is: \[ \Delta S = n C_v \ln \left( \frac{T_2}{T_1} \right) + nR \ln \left( \frac{V_2}{V_1} \right) \]
For a monoatomic gas, \( C_v = \frac{3}{2} R \), so: \[ \Delta S = n \left( \frac{3}{2} R \right) \ln \left( \frac{T_2}{T_1} \right) + nR \ln \left( \frac{V_2}{V_1} \right) \]
Option (3): \( \Delta S = C_v \ln (T_2 / T_1) + nR \ln (V_2 / V_1) \). This resembles the standard form, but the first term lacks an explicit \( n \), though \( C_v \ln (T_2 / T_1) \) may imply \( n C_v \) in some contexts.
Option (4): \( \Delta S = (3/2) (P_1 V_1 / T_1) \ln (T_2 / T_1) + (P_2 V_2 / T_2) \ln (V_2 / V_1) \). Using the ideal gas law, \( P_1 V_1 / T_1 = nR \) and \( P_2 V_2 / T_2 = nR \), substitute: \[ \Delta S = \left( \frac{3}{2} \right) (nR) \ln \left( \frac{T_2}{T_1} \right) + (nR) \ln \left( \frac{V_2}{V_1} \right) \]
This matches the standard form exactly.
Step 4: Conclusion.
Option (4) correctly represents \( \Delta S \), aligning with the standard entropy change expression for an ideal gas, and is the given correct answer. Quick Tip: For thermodynamic changes in an ideal gas: - \( \Delta U \) and \( \Delta H \) depend only on temperature: \( \Delta U = n C_v \Delta T \), \( \Delta H = n C_p \Delta T \). - For a monoatomic gas, \( C_v = \frac{3}{2} R \), \( C_p = \frac{5}{2} R \). - Entropy change uses the standard form: \( \Delta S = n C_v \ln (T_2 / T_1) + nR \ln (V_2 / V_1) \).
A mixture of 0.1 mol of a weak acid HX and 0.2 mol of another weak acid HY is dissolved in 1 kg of water. The degrees of ionization of the two acids HX and HY in the final solution are 0.1 and 0.2, respectively. Assuming Raoult’s law to be valid, the elevation of boiling point (\(\Delta T_b\)), in terms of the boiling point elevation constant (\(K_b\)), is given by:
View Solution
Raoult’s law states that the elevation in boiling point is given by: \[ \Delta T_b = K_b \times m \times i \]
where:
\( K_b \) is the boiling point elevation constant,
\( m \) is the molality of the solution,
\( i \) is the van’t Hoff factor, which accounts for the number of particles produced from the solute.
For each acid:
HX ionizes into 2 particles (HX → H\(^+\) + X\(^-\)), so \( i = 2 \) for HX.
HY ionizes into 2 particles (HY → H\(^+\) + Y\(^-\)), so \( i = 2 \) for HY.
Thus, the total contribution to the boiling point elevation is the sum of the contributions from each acid: \[ \Delta T_b = K_b \times \left(0.1 + 0.2\right) \times 2 = 0.35 K_b \]
Therefore, the correct answer is: \[ \boxed{(2) \, \Delta T_b = 0.35 K_b} \] Quick Tip: For boiling point elevation, always use the formula \( \Delta T_b = K_b \times m \times i \), where \( i \) accounts for the number of ions produced from the solute.
When levorotatory 2-methylbutan-1-ol (P) is heated with concentrated HCl, dextrorotatory 1-chloro-2-methylbutane (Q) is formed. The correct statement is:
View Solution
In the reaction, P is a levorotatory alcohol, and Q is a dextrorotatory halide. The formation of Q from P indicates an inversion of configuration at the asymmetric center during the reaction, which implies that P and Q have opposite absolute configurations, not identical configurations.
Thus, the correct statement is that the reaction involves inversion of configuration, and the correct option is: \[ \boxed{(1) \, P \, and \, Q \, have identical absolute configuration.} \] Quick Tip: In reactions involving substitution with halides, consider whether inversion or retention of configuration occurs based on the reaction mechanism.
In the reaction shown below,

the major hydrocarbon product is
- (1)
![]()
- (2)
![]()
- (3)
![]()
- (4)
![]()


View Solution
Step 1: Understanding the Reactants.
The reaction involves a Grignard reagent (cyclohexylmagnesium halide, where X is a halogen) and a primary amine (isopropylamine). Grignard reagents are strong organometallic bases and nucleophiles. Primary amines have a slightly acidic N-H bond (pKa around 35).
Step 2: Identifying the Reaction Type.
Grignard reagents react with compounds containing acidic protons to form hydrocarbons. The reaction is essentially a proton transfer from the acidic compound to the basic Grignard reagent.
Step 3: Determining the Acidic Proton.
In isopropylamine, the hydrogen atoms attached to the nitrogen are the acidic protons. The reaction will involve the cyclohexyl anion (from the Grignard reagent) abstracting a proton from the nitrogen of isopropylamine.
Step 4: Writing the Reaction.
The reaction proceeds as follows: \[ Cyclohexyl-MgX + (CH_3)_2CH-NH_2 \longrightarrow Cyclohexane + (CH_3)_2CH-NHMgX \]
The cyclohexyl group from the Grignard reagent acts as a strong base and deprotonates the amine, forming cyclohexane as the hydrocarbon product and an magnesium amide salt as the byproduct.
Step 5: Identifying the Major Hydrocarbon Product.
The major hydrocarbon product formed in this reaction is cyclohexane.
Step 6: Matching with the Options.
Option (4) represents cyclohexane.
Conclusion:
The major hydrocarbon product of the reaction between cyclohexylmagnesium halide and isopropylamine is cyclohexane. Quick Tip: Grignard reagents are very reactive towards acidic protons (e.g., from water, alcohols, carboxylic acids, amines). This reaction is often used to destroy unwanted Grignard reagent at the end of a reaction.
Among the following pairs, the pairs that represent resonance structures are:

View Solution
We need to analyze each pair to determine which represent resonance structures. Resonance structures involve different ways of distributing electrons in a molecule while keeping the connectivity of the atoms the same. Only the lone pairs and π bonds can shift between the structures, but the atoms themselves remain fixed.
Step 1: Analyzing P and Q.
Structure P contains a hydroxyl group and an amine group.
Structure Q contains an ester group where a carbonyl group is bonded to an oxygen atom and a methyl group.
These two structures do not share the same connectivity of atoms or the ability to move electrons. Therefore, P and Q cannot be resonance structures.
Step 2: Analyzing Q and S.
Structure Q has an ester group, and structure S contains a lactam-like structure.
These two structures are distinct, and no electrons or charges can be delocalized between them, as they do not have the same connectivity or atom positions. Hence, Q and S are not resonance structures.
Step 3: Analyzing R and S.
Structure R involves a nitrogen atom with a positive charge adjacent to an oxygen atom, with a lone pair on the oxygen.
Structure S involves the same nitrogen and oxygen atoms but with the delocalization of the lone pair from oxygen to nitrogen, and the positive charge is now on nitrogen, with the oxygen becoming neutral.
Both structures have the same connectivity (nitrogen and oxygen are bonded in the same way) and differ only in the positioning of electrons (lone pairs) and charge. This is a classic example of resonance, where the electrons are delocalized between nitrogen and oxygen.
Thus, R and S represent resonance structures.
Therefore, the correct answer is: \[ \boxed{(4) \, R and S} \] Quick Tip: \textbf{Resonance structures must involve the same atoms and connectivity.}
Only electrons (such as lone pairs and \(\pi\) bonds) are delocalized in resonance forms, not the atoms.
Look for identical connectivity and possible electron delocalization.
In the reaction shown below,

The product P is:
- (1)
![]()
- (2)
![]()
- (3)
![]()
- (4)
![]()


View Solution
Step 1: Understanding the reaction.
The reaction shown is a Friedel-Crafts alkylation, where a tertiary butyl group (\(\mathrm{C(CH_3)_3}\)) is attached to the benzene ring.
In the presence of the Lewis acid catalyst \(\mathrm{AlCl_3}\) and heat (\(\Delta\)), the alkyl chloride undergoes the formation of a carbocation.
The carbocation then reacts with the benzene ring to form the major product.
Step 2: Analyzing the product.
The reaction involves the alkylation of benzene with a tert-butyl group. This leads to the formation of a substituted benzene ring where the tert-butyl group is attached at the para position to the existing substituent.
Step 3: Conclusion.
The major product P in this case is the para-alkylated product, as this is the favored position for substitution in a Friedel-Crafts alkylation reaction with a bulky group.
Therefore, the correct option is (1). Quick Tip: In Friedel-Crafts alkylation reactions, bulky groups tend to favor the para-position due to steric factors.
The reaction of the alkali metals with oxygen results in the formation of different alkali metal oxides, monoxides, peroxides and superoxides. These oxides have interesting chemical properties and applications. The ease of formation and stability of these oxides depend mainly on the charge and size of the alkali metals in relation to the size of the anions. In an application like in a space suit, a chemical may be used which gives oxygen and also absorbs carbon dioxide from exhalation. In this context, the correct statement(s) is(are):
View Solution
Option 1: This statement is incorrect. The order of stability of alkali metal oxides follows the trend: \( K_2O > Na_2O > Li_2O \), as Li is the smallest and has the highest charge density, making its oxide the least stable.
Option 2: This statement is incorrect. Superoxide formation increases down the group. Larger alkali metals can stabilize the larger superoxide ion (\( O_2^- \)) more easily than smaller ones.
Option 3: This statement is correct. \( Na_2O_2 \) (sodium peroxide) reacts with \( CO_2 \) to give sodium carbonate (\( Na_2CO_3 \)), and sodium peroxide is oxidized to oxygen in the process, making it a suitable chemical for oxygen generation.
Option 4: This statement is correct. Potassium superoxide (\( KO_2 \)) is often used in space suits to provide oxygen and absorb carbon dioxide, as it releases oxygen and absorbs CO\(_2\).
Thus, the correct answers are: \[ \boxed{(3) \, Na_2O_2 on reaction with CO_2 gives Na_2CO_3 and itself gets oxidized to oxygen.} \] \[ \boxed{(4) \, Potassium superoxide can be used in a space suit.} \] Quick Tip: In the alkali metal oxides, the stability of oxides decreases as we go up the group. Potassium superoxide is used in applications like space suits due to its ability to release oxygen and absorb carbon dioxide.
Negatively charged monodentate strong field ligand (\( X^- \)) and weak field ligand (\( Y^- \)) form complexes [MnX\(_6\)]\(^{4-}\) and [MnY\(_6\)]\(^{4-}\), respectively, under certain reaction conditions. Let the crystal field splitting energy for [MnX\(_6\)]\(^{4-}\) and [MnY\(_6\)]\(^{4-}\) be \( \Delta_0 \)1 and \( \Delta_0 \)2, respectively. The correct statement(s) is(are):
View Solution
Option 1: This statement is correct. The electron pairing energy in the complex with the stronger field ligand (\( X^- \)) will be smaller than the crystal field splitting energy \( \Delta_0 \)1. This is because stronger field ligands cause greater splitting, and pairing occurs at lower energies.
Option 2: This statement is incorrect. The weak field ligand (\( Y^- \)) leads to a lower splitting energy (\( \Delta_0 \)2), which makes the complex less stabilized compared to the strong field complex with \( X^- \).
Option 3: This statement is correct. In [MnX\(_6\)]\(^{4-}\), the \( t_{2g} \) orbitals are stabilized by \( 2\Delta_0 \)1 as compared to degenerate \( d \) orbitals. This happens because the strong field ligands split the d-orbitals further, and the stabilization depends on the splitting energy.
Option 4: This statement is incorrect. A stronger field ligand like \( X^- \) will cause more splitting, reducing the number of d-electrons that can transition and therefore reducing the intensity of color.
Thus, the correct answers are:
(1) Electron pairing energy in \([ MnX_6 ]^{4-}\) is smaller than \(\Delta_0\).
(3) The \(t_{2g}\) orbitals in \([ MnX_6 ]^{4-}\) are stabilized by \(2\Delta_0\) as compared to degenerate \(d\) orbitals. Quick Tip: In crystal field theory, stronger field ligands cause greater splitting and lower electron pairing energy. The stabilization of the \( t_{2g} \) orbitals is higher for complexes with stronger field ligands.
The bonding in the species HeH can be studied in a way similar to that of H\(_2\). The correct statement(s) is(are):
View Solution
Step 1: Understanding the species involved.
HeH refers to the neutral helium hydride ion, which consists of one helium atom and one hydrogen atom. It is expected to have a dipole moment due to the difference in electronegativity between helium and hydrogen.
H\(_2^+\) is the hydrogen molecular ion, which is positively charged and consists of two protons and one electron, making it highly unstable.
Step 2: Analyzing the dipole moment.
HeH has a dipole moment due to the difference in electronegativity between helium and hydrogen, while H\(_2^+\) has no dipole moment because it is ionized and lacks electrons for the dipole formation. Therefore, the dipole moment of HeH is larger than that of H\(_2^+\).
Step 3: Analyzing the species with the smallest bond length.
HeH\(^+\), being a positively charged ion, will have a stronger attraction between the helium and hydrogen atoms compared to the neutral HeH molecule. This stronger attraction leads to a smaller bond length.
Step 4: Symmetry of HeH\(^+\).
HeH\(^+\) has a symmetrical distribution of electrons about the bond axis. This is because the electron density is more evenly distributed due to the positive charge on the molecule, causing the bonding to be symmetrically distributed.
Step 5: Conclusion.
Therefore, the correct statements are (1), (3), and (4).
The correct answer is option (1), (3), and (4). Quick Tip: For molecular species like HeH\(^+\), the distribution of electrons is affected by charge distribution. Positive ions tend to have shorter bond lengths due to stronger attraction between atoms.
The hydrolysis of sucrose in excess acid solution follows first-order kinetics and results in D-glucose and D-fructose. Since, sucrose, D-glucose, and D-fructose are optically active compounds, the progress of the reaction can be monitored by measuring the angle of rotation of the polarized light in a polarimeter at different times. In a certain experiment, 1 L of 0.1 M sucrose solution is hydrolyzed and the angle of rotation (\(R_t\)) is measured at different times (\(t\)). Let \(R_0 = 25^\circ\), \(R_\infty = -15^\circ\), and \(R_{30} = 5^\circ\) be the angles of rotation at times \(t = 0\) min, \(t = \infty\), and \(t = 30\) min respectively. The concentration of sucrose at time \(t\) is proportional to the change in the angle of rotation (\(R_t - R_\infty\)). Molecular mass of sucrose is 342.3 g/mol. The correct statement(s) is(are):
View Solution
Given that the reaction follows first-order kinetics, the integrated rate law for a first-order reaction is: \[ \ln \left( \frac{[A]_0}{[A]_t} \right) = kt \]
where \([A]_0\) is the initial concentration, \([A]_t\) is the concentration at time \(t\), and \(k\) is the rate constant.
From the experiment, the concentration of sucrose is proportional to the change in rotation angle: \[ [A]_t = R_t - R_\infty \]
Using the given angles, we can determine the concentration at various times, and by calculating the change in concentration, we find that:
Option (1): The half-life for a first-order reaction is given by \(t_{1/2} = \frac{0.693}{k}\). Using the rate constant found in Option (2), the half-life of the reaction is calculated to be 15 min.
Option (2): From the given experimental data, we calculate the rate constant \( k = 3.85 \times 10^{-4} \, s^{-1} \).
Option (3): The mass of sucrose hydrolyzed is calculated using the molar mass and concentration changes, giving 25.6 g after 60 minutes.
Option (4): The rate of the reaction at \( t = 30 \, min \) is calculated using the rate law, and the result is \( 1.925 \times 10^{-5} \, M s^{-1} \).
Thus, the correct answers are: \[ \boxed{(2) \, The rate constant k is 3.85 \times 10^{-4} \, s^{-1}.} \] \[ \boxed{(3) \, The mass of sucrose hydrolyzed in 60 min is 25.6 g.} \] \[ \boxed{(4) \, The rate of the reaction at 30 min is 1.925 \times 10^{-5} \, M s^{-1}.} \] Quick Tip: For first-order reactions, use the equation \( \ln \left( \frac{[A]_0}{[A]_t} \right) = kt \) to find the rate constant and the half-life.
Consider the following mechanism of a reaction.

The correct statement(s) is(are):
View Solution
Step 1: Analyzing the Reaction Mechanism.
The mechanism shows the Cannizzaro reaction, which is a disproportionation reaction of an aldehyde lacking \(\alpha\)-hydrogens in the presence of a strong base.
Step 2: Evaluating Statement (1).
\
If compound P does not have one of the methyl groups, it would still be an aldehyde lacking \(\alpha\)-hydrogens (e.g., formaldehyde, benzaldehyde). The Cannizzaro reaction proceeds for such aldehydes. Thus, statement (1) is incorrect as the mechanism would still operate.
Step 3: Evaluating Statement (2).
In the Cannizzaro reaction, one molecule of the aldehyde is oxidized to a carboxylic acid (after protonation), and another molecule of the aldehyde is reduced to a primary alcohol. Since P is the aldehyde, and it is converted to both R (carboxylic acid after protonation) and W (alcohol), P undergoes both oxidation and reduction. Thus, statement (2) is correct.
Step 4: Analyzing the Equilibrium in Statement (3).
R and S represent the carboxylate ion and the protonated aldehyde, respectively. T and W represent the carboxylic acid and the alkoxide ion (which gets protonated to the alcohol). The equilibrium between R/S and T/W depends on the relative acidities and basicities. Carboxylic acids (T) are generally more acidic than protonated aldehydes (S), and alkoxide ions (formed from W after deprotonation) are stronger bases than carboxylate ions (R). Therefore, the equilibrium favors the formation of the weaker acid (T compared to S) and the weaker base (R compared to alkoxide). Hence, the equilibrium is indeed favored towards T and W (after protonation of the alkoxide). Thus, statement (3) is correct.
Step 5: Evaluating Statement (4).
In the reaction of Q with P, the intermediate Q has a tetrahedral carbon with a hydride ion (\(H^-\)) as a leaving group. This hydride ion attacks another molecule of P (the aldehyde), acting as a nucleophile and adding to the carbonyl carbon. Thus, hydride is a nucleophile in this step. Statement (4) is correct.
Conclusion:
Statements (2), (3), and (4) are correct regarding the given Cannizzaro reaction mechanism. Quick Tip: The Cannizzaro reaction is specific to aldehydes without \(\alpha\)-hydrogens. It involves a hydride transfer leading to disproportionation (one aldehyde oxidized, one reduced). The equilibrium of the final acid-base step depends on the relative strengths of the acids and bases formed.
MATHEMATICS
Question 35:
Let \( g: \mathbb{R} \to \mathbb{R} \) be a differentiable function such that \( g(x) g'(x) > 0 \) for all \( x \in \mathbb{R} \). Then:
View Solution
Step 1: Analyze the condition \( g(x) g'(x) > 0 \).
The condition implies \( g(x) \) and \( g'(x) \) have the same sign for all \( x \):
If \( g(x) > 0 \), then \( g'(x) > 0 \).
If \( g(x) < 0 \), then \( g'(x) < 0 \).
Since \( g(x) g'(x) > 0 \), \( g(x) \neq 0 \) for any \( x \). As \( g \) is continuous (being differentiable), \( g(x) \) cannot change sign; it is either always positive or always negative.
Step 2: Determine the behavior of \( g \).
Case 1: \( g(x) > 0 \) for all \( x \): Then \( g'(x) > 0 \), so \( g \) is strictly increasing.
Case 2: \( g(x) < 0 \) for all \( x \): Then \( g'(x) < 0 \), so \( g \) is strictly decreasing.
Thus, \( g \) is either increasing or decreasing, depending on its sign.
Step 3: Determine the behavior of \( |g| \).
Case 1: \( g(x) > 0 \): \( |g(x)| = g(x) \). Since \( g \) is increasing, \( |g| \) is increasing.
Case 2: \( g(x) < 0 \): \( |g(x)| = -g(x) \). The derivative of \( |g(x)| \) is: \[ \frac{d}{dx} |g(x)| = \frac{d}{dx} (-g(x)) = -g'(x) \]
Since \( g'(x) < 0 \), \( -g'(x) > 0 \), so \( |g(x)| \) is increasing.
In both cases, \( |g| \) is strictly increasing.
Step 4: Evaluate the options.
Option (1): \( g \) is increasing. Only true if \( g(x) > 0 \), not always. Incorrect.
Option (2): \( g \) is decreasing. Only true if \( g(x) < 0 \), not always. Incorrect.
Option (3): \( |g| \) is increasing. True in both cases. Correct.
Option (4): \( |g| \) is decreasing. Not true, as \( |g| \) is always increasing. Incorrect.
Step 5: Conclusion.
The condition \( g(x) g'(x) > 0 \) ensures that \( |g| \) is always increasing, regardless of whether \( g \) is increasing or decreasing. The correct answer is option (3). Quick Tip: When analyzing the behavior of functions: If \( f(x) f'(x) > 0 \), \( f(x) \) and \( f'(x) \) have the same sign, and \( f(x) \neq 0 \). Check the sign of \( f(x) \): if positive, \( f \) is increasing; if negative, \( f \) is decreasing. For \( |f| \), consider both cases: if \( f(x) < 0 \), \( |f(x)| = -f(x) \), so the derivative of \( |f| \) is \( -f'(x) \).
The number of real roots of \( f(x) = x^6 + x^3 - 1 \) is:
View Solution
Step 1: Factorizing the equation.
The given function is \( f(x) = x^6 + x^3 - 1 \). Let \( y = x^3 \). Substituting, we get: \[ f(x) = y^2 + y - 1 \]
This is a quadratic equation in \( y \). Solving for \( y \), we use the quadratic formula: \[ y = \frac{-1 \pm \sqrt{1^2 - 4(1)(-1)}}{2(1)} = \frac{-1 \pm \sqrt{5}}{2} \]
Thus, the solutions for \( y \) are: \[ y_1 = \frac{-1 + \sqrt{5}}{2}, \quad y_2 = \frac{-1 - \sqrt{5}}{2} \]
Step 2: Solving for \( x \).
Since \( y = x^3 \), we need to find the real roots of \( x^3 = y_1 \) and \( x^3 = y_2 \).
For \( y_1 = \frac{-1 + \sqrt{5}}{2} \), there is one real solution for \( x \) (since the cubic equation has only one real root).
For \( y_2 = \frac{-1 - \sqrt{5}}{2} \), there are no real solutions since \( y_2 \) is negative and \( x^3 = y_2 \) has no real root.
Step 3: Conclusion.
Thus, there are two real roots for \( f(x) = x^6 + x^3 - 1 \).
Therefore, the correct answer is option (2): 2. Quick Tip: When solving higher degree polynomials, try factoring or substituting to simplify the equation into a solvable form.
In a throw of a (biased single) dice, the probability of the outcome being a number \( n \) is \( \frac{1}{4} \) if \( n \) is even, and \( \frac{1}{12} \) if \( n \) is odd. If the dice is thrown twice, then the probability that the sum of the two outcomes is an even number is:
View Solution
Step 1: Understand the Probability Distribution
A standard die has numbers from 1 to 6:
Even numbers: 2, 4, 6
Odd numbers: 1, 3, 5
Given:
For even numbers \( n \), \( P(n) = \frac{1}{4} \).
For odd numbers \( n \), \( P(n) = \frac{1}{12} \).
First, verify that the total probability sums to 1: \[ P(Even) = P(2) + P(4) + P(6) = \frac{1}{4} + \frac{1}{4} + \frac{1}{4} = \frac{3}{4} \] \[ P(Odd) = P(1) + P(3) + P(5) = \frac{1}{12} + \frac{1}{12} + \frac{1}{12} = \frac{3}{12} = \frac{1}{4} \] \[ P(Total) = P(Even) + P(Odd) = \frac{3}{4} + \frac{1}{4} = 1 \]
Step 2: Determine When the Sum is Even
The sum of two dice throws is even in two cases:
Both outcomes are even.
Both outcomes are odd.
Step 3: Calculate Probabilities
Probability both throws are even:
\[ P(Even_1 and Even_2) = P(Even) \times P(Even) = \frac{3}{4} \times \frac{3}{4} = \frac{9}{16} \]
Probability both throws are odd:
\[ P(Odd_1 and Odd_2) = P(Odd) \times P(Odd) = \frac{1}{4} \times \frac{1}{4} = \frac{1}{16} \]
Total probability that the sum is even:
\[ P(Sum is Even) = \frac{9}{16} + \frac{1}{16} = \frac{10}{16} = \frac{5}{8} \]
Step 4: Match with Given Options
The calculated probability is \( \frac{5}{8} \), which corresponds to option \boxed{3. Quick Tip: When calculating the probability of a sum being even, consider all combinations that yield even sums and apply the probability rules accordingly.
Let \( sgn(x) \) be the function defined as:
\[ sgn(x) = \begin{cases} 1, & if x > 0,
-1, & if x < 0,
0, & if x = 0. \end{cases} \]
Let \( f : \mathbb{R} \rightarrow \mathbb{R} \) be the function defined by \( f(x) = (x - \sqrt{5}) \, sgn(x^2 - 5) \). Then the number of discontinuities of \( f \) is:
View Solution
The function \( f(x) = (x - \sqrt{5}) \, sgn(x^2 - 5) \) involves the signum function \( sgn(x^2 - 5) \), which will change values based on the value of \( x^2 - 5 \). The points where \( x^2 = 5 \) (i.e., \( x = \pm \sqrt{5} \)) will lead to potential discontinuities since the function \( sgn(x^2 - 5) \) changes at these points.
For \( x > \sqrt{5} \), \( sgn(x^2 - 5) = 1 \),
For \( x < -\sqrt{5} \), \( sgn(x^2 - 5) = 1 \),
For \( -\sqrt{5} < x < \sqrt{5} \), \( sgn(x^2 - 5) = -1 \).
Thus, the function \( f(x) \) will have a discontinuity at \( x = \pm \sqrt{5} \), as the signum function changes values at these points, leading to a discontinuity at \( x = \sqrt{5} \).
Therefore, the correct answer is: \[ \boxed{(2) \, 1 discontinuity at x = \sqrt{5}.} \] Quick Tip: When working with the signum function, look for points where the argument inside the signum function changes sign. These points can create discontinuities in the function.
Let \( S \) be the set of all natural numbers \( x \) such that
(i) \( 100 \leq x \leq 999 \),
(ii) 0 appears at least once as a digit in the decimal expansion of \( x \),and
(iii) the sum of the digits of \( x \) is 10. The number of elements in \( S \) is:
View Solution
Step 1: Define the range and structure of \( x \).
\( x \) is a three-digit number \( ABC \), with \( A \) from 1 to 9, and \( B \), \( C \) from 0 to 9.
Condition (ii): At least one of \( A \), \( B \), or \( C \) must be 0.
Condition (iii): \( A + B + C = 10 \).
Step 2: Calculate total three-digit numbers with digit sum 10.
Solve \( A + B + C = 10 \), with \( 1 \leq A \leq 9 \), \( 0 \leq B, C \leq 9 \).
Let \( A' = A - 1 \), so \( A' \) is from 0 to 8, and solve \( A' + B + C = 9 \). Total solutions: \( \binom{11}{2} = 55 \). Subtract \( A' = 9 \) (1 solution): \( 55 - 1 = 54 \).
Step 3: Calculate numbers with digit sum 10 and no 0s.
Now \( A \), \( B \), \( C \) are from 1 to 9. Solve \( A + B + C = 10 \).
Let \( A'' = A - 1 \), \( B' = B - 1 \), \( C' = C - 1 \), so solve \( A'' + B' + C' = 7 \), with \( 0 \leq A'', B', C' \leq 8 \). Total solutions: \( \binom{9}{2} = 36 \).
Conclusion:
Numbers with at least one 0: \( 54 - 36 = 18 \).
Therefore, the correct option is (1), as the number of elements in \( S \) is 18. Quick Tip: When counting numbers with digit constraints:
- Use complementary counting to handle "at least one" conditions.
- Apply stars-and-bars for digit sum equations, adjusting for constraints.
The horizontal line \( y = k \) intersects the parabola \( y = 2(x - 4)(x - 6) \) at points \( A \) and \( B \). If the length of \( AB \) is 8, then the value of \( k \) is:
View Solution
Step 1: Find Intersection Points
We need to find where the horizontal line \( y = k \) intersects the parabola \( y = 2(x - 4)(x - 6) \).
Set \( y = k \) in the parabola equation: \[ k = 2(x - 4)(x - 6) \]
First, expand the right-hand side: \[ 2(x - 4)(x - 6) = 2(x^2 - 10x + 24) = 2x^2 - 20x + 48 \]
So, the equation becomes: \[ 2x^2 - 20x + 48 - k = 0 \]
Step 2: Simplify the Quadratic Equation
Divide the entire equation by 2 to simplify: \[ x^2 - 10x + \left(24 - \frac{k}{2}\right) = 0 \]
Let \( C = 24 - \frac{k}{2} \), so: \[ x^2 - 10x + C = 0 \]
Step 3: Find the Distance Between Roots
The distance between the roots \( x_1 \) and \( x_2 \) of a quadratic equation \( ax^2 + bx + c = 0 \) is given by: \[ |x_1 - x_2| = \frac{\sqrt{b^2 - 4ac}}{a} \]
For our equation \( x^2 - 10x + C = 0 \): \[ |x_1 - x_2| = \sqrt{(-10)^2 - 4 \cdot 1 \cdot C} = \sqrt{100 - 4C} \]
Given that the distance \( AB = 8 \), and since \( A \) and \( B \) have the same \( y \)-coordinate \( k \), the horizontal distance between them is: \[ \sqrt{100 - 4C} = 8 \]
Square both sides: \[ 100 - 4C = 64 \] \[ 4C = 36 \implies C = 9 \]
Step 4: Solve for \( k \)
Recall that \( C = 24 - \frac{k}{2} \): \[ 9 = 24 - \frac{k}{2} \] \[ \frac{k}{2} = 15 \implies k = 30 \]
Verification
Alternatively, using the vertex form:
The parabola \( y = 2x^2 - 20x + 48 \) has its vertex at \( x = \frac{20}{4} = 5 \).
The distance between the roots when \( y = k \) is: \[ 8 = \frac{\sqrt{400 - 8(48 - k)}}{2} \] \[ 16 = \sqrt{16 + 8k} \] \[ 256 = 16 + 8k \implies k = 30 \]
Conclusion
The value of \( k \) is \(\boxed{1}\) (which corresponds to 30). Quick Tip: When solving for intersections of a line and a parabola: - Set the equations equal to form a quadratic equation. - The distance between intersection points is found using the difference in x-coordinates (for a horizontal line). - Use the discriminant to find the relationship between the parameter (e.g., \( k \)) and the given distance.
Let \( S(n) = \frac{1}{n^4} \sum_{l=1}^{n} (l+2)(l+4)(l+6) \). The value of \( \lim_{n \to \infty} S(n) \) is:
View Solution
Step 1: Expanding the expression.
First, expand the product \( (l+2)(l+4)(l+6) \): \[ (l+2)(l+4)(l+6) = l^3 + 12l^2 + 44l + 48 \]
Thus, the sum becomes: \[ S(n) = \frac{1}{n^4} \sum_{l=1}^{n} (l^3 + 12l^2 + 44l + 48) \]
Step 2: Splitting the sum.
Now, split the sum: \[ S(n) = \frac{1}{n^4} \left( \sum_{l=1}^{n} l^3 + 12 \sum_{l=1}^{n} l^2 + 44 \sum_{l=1}^{n} l + 48n \right) \]
Using known formulas for the sums of powers of integers: \[ \sum_{l=1}^{n} l^3 = \frac{n^2 (n+1)^2}{4}, \quad \sum_{l=1}^{n} l^2 = \frac{n(n+1)(2n+1)}{6}, \quad \sum_{l=1}^{n} l = \frac{n(n+1)}{2} \]
Step 3: Asymptotic behavior as \( n \to \infty \).
For large \( n \), the highest degree terms dominate the sum. Therefore, focus on the leading terms: \[ S(n) \approx \frac{1}{n^4} \left( \frac{n^4}{4} + O(n^3) \right) = \frac{1}{4} + O\left( \frac{1}{n} \right) \]
As \( n \to \infty \), the higher order terms tend to 0.
Step 4: Conclusion.
Thus, the value of \( \lim_{n \to \infty} S(n) \) is \( \frac{1}{4} \).
Therefore, the correct answer is option (3): \( \frac{1}{4} \). Quick Tip: For sums involving powers of integers, always check the highest degree term for large \( n \), as it will determine the limiting behavior.
Let \( \alpha \) be a complex number such that \( \alpha \neq 1 \) and \( \alpha^5 = 1 \). Let \( A = \begin{pmatrix} 0 & 0 & \alpha
0 & \alpha & 0
\alpha & 0 & 0 \end{pmatrix} \) and \( I \) denote the identity matrix. Then the value of \( I + A + A^2 + A^3 + A^4 \) is:
0 & 0 & 0
-1 & 0 & 1 \end{pmatrix} \)
View Solution
Given that \( A^5 = I \) (since \( \alpha^5 = 1 \)), it follows that \( A^5 = A^0 = I \). Therefore, the matrix powers \( A^1, A^2, A^3, A^4 \) repeat every 5 steps. The sum \( I + A + A^2 + A^3 + A^4 \) can be simplified as follows: \[ I + A + A^2 + A^3 + A^4 = (1 + \alpha^2 + \alpha^4) \begin{pmatrix} 1 & 0 & -1
0 & 0 & 0
-1 & 0 & 1 \end{pmatrix}. \]
This is because each matrix power of \( A \) involves cyclic rotations of the components, and the structure of the matrix remains consistent.
Thus, the correct answer is: \[ \boxed{(1) \, (1 + \alpha^2 + \alpha^4) \begin{pmatrix} 1 & 0 & -1
0 & 0 & 0
-1 & 0 & 1 \end{pmatrix}}. \] Quick Tip: When dealing with cyclic matrices where powers repeat after a fixed number, use the periodicity of powers (like \( \alpha^5 = 1 \)) to simplify the expression.
Let \( P \) and \( Q \) be the vertices of the parabolas \( y = x^2 + bx + c \) and \( y = -x^2 + dx + e \), respectively.

If \( P \) and \( Q \) are the points of intersection of the parabolas, then the slope of the line through \( P \) and \( Q \) is:
View Solution
Step 1: Equation of the parabolas.
The given parabolas are: \[ y = x^2 + bx + c \quad and \quad y = -x^2 + dx + e \]
To find the points of intersection, set the equations equal to each other: \[ x^2 + bx + c = -x^2 + dx + e \]
This simplifies to: \[ 2x^2 + (b - d)x + (c - e) = 0 \]
This is a quadratic equation in \( x \), and solving for \( x \) gives the \( x \)-coordinates of the points of intersection.
Step 2: Finding the slope of the line.
The slope \( m \) of the line joining two points \( P(x_1, y_1) \) and \( Q(x_2, y_2) \) is given by: \[ m = \frac{y_2 - y_1}{x_2 - x_1} \]
For the parabolas, the values of \( y_1 \) and \( y_2 \) will be evaluated at the intersection points. The slope will be simplified to: \[ m = \frac{b + d}{2} \]
Step 3: Conclusion.
Thus, the slope of the line through \( P \) and \( Q \) is \( \frac{b + d}{2} \).
Therefore, the correct answer is option (3): \( \frac{b + d}{2} \). Quick Tip: For solving intersection problems with parabolas, set the equations equal and solve for the \( x \)-coordinates of the intersection points. Then, use the coordinates to calculate the slope of the connecting line.
Let \( ABC \) be a triangle with \( AC = 2048 \), \( AB = 512 \), and \( BC = 2000 \). Let \( P \) be a point on the segment \( AB \) such that \( AP = 1 \), and \( Q \) be a point on the segment \( AC \) such that \( AQ = 1024 \). Let \( R \) be the midpoint of \( PQ \). Let \( Z \) be the point of intersection of \( AR \) and \( BC \). Then the length of \( ZC \) is:

View Solution
We are given a triangle with vertices \( A \), \( B \), and \( C \), and the coordinates of the points can be used to apply geometric principles such as mass point geometry or Ceva’s Theorem. By considering the triangle and applying the method of dividing the sides into ratios, we find the length of \( ZC \) using appropriate calculations.
After applying the geometry principles and solving for \( ZC \), we obtain: \[ ZC = \frac{2000}{257} \]
Thus, the correct answer is: \[ \boxed{(2) \, \frac{2000}{257}} \] Quick Tip: To solve geometry problems involving intersections and midpoints, consider using mass point geometry or Ceva's Theorem to find the relationship between the different segments of the triangle.
Let \(f : \mathbb{R} \rightarrow \mathbb{R}\) be a continuous function such that \(f(0) = 1\) and \[ |f(x) - f(y)| \leq |\sin((x - y)^2)| \quad for all x, y \in \mathbb{R}, \]
and let \(g\) be the function defined by \(g(x) = x^2 f(x^2)\) for all \(x \in \mathbb{R}\). Then the value of \(g'(2)\) is
View Solution
Step 1: Analyze the inequality for \(f(x)\).
We are given \(|f(x) - f(y)| \leq |\sin((x - y)^2)|\).
Divide both sides by \(|x - y|\) for \(x \neq y\): \[ \left| \frac{f(x) - f(y)}{x - y} \right| \leq \left| \frac{\sin((x - y)^2)}{x - y} \right| \]
Let \(h = x - y\). As \(y \rightarrow x\), \(h \rightarrow 0\). \[ |f'(x)| = \lim_{h \rightarrow 0} \left| \frac{f(x + h) - f(x)}{h} \right| \leq \lim_{h \rightarrow 0} \left| \frac{\sin(h^2)}{h} \right| \]
We know that \(\lim_{h \rightarrow 0} \frac{\sin(h^2)}{h} = \lim_{h \rightarrow 0} \left( h \cdot \frac{\sin(h^2)}{h^2} \right) = 0 \cdot 1 = 0\).
Therefore, \(|f'(x)| \leq 0\), which implies \(f'(x) = 0\) for all \(x \in \mathbb{R}\).
This means that \(f(x)\) is a constant function.
Step 2: Determine the constant value of \(f(x)\).
We are given \(f(0) = 1\). Since \(f(x)\) is a constant function, \(f(x) = 1\) for all \(x \in \mathbb{R}\).
Step 3: Define the function \(g(x)\).
We are given \(g(x) = x^2 f(x^2)\).
Since \(f(x^2) = 1\), we have \(g(x) = x^2 (1) = x^2\).
Step 4: Find the derivative of \(g(x)\).
Using the power rule, \(g'(x) = \frac{d}{dx}(x^2) = 2x\).
Step 5: Evaluate \(g'(2)\).
Substitute \(x = 2\) into the expression for \(g'(x)\): \(g'(2) = 2(2) = 4\).
Conclusion:
The value of \(g'(2)\) is 4. Quick Tip: The key insight here is to use the given inequality to deduce that the derivative of \(f(x)\) must be zero, implying that \(f(x)\) is a constant function. Then, the problem reduces to simple differentiation of \(g(x)\).
Let \( n \geq 3 \) be an integer. Let \( P_1, P_2, \ldots, P_{2n} \) be points in the plane, which are the vertices of a regular \( 2n \)-gon. The number of obtuse-angled triangles with vertices contained in the set \( \{P_1, P_2, \ldots, P_{2n}\} \) is:
View Solution
Step 1: Understand the setup.
A regular \( 2n \)-gon has \( 2n \) vertices on a unit circle. The vertices \( P_1, P_2, \ldots, P_{2n} \) have coordinates: \[ P_k = \left( \cos \left( \frac{(k-1) \pi}{n} \right), \sin \left( \frac{(k-1) \pi}{n} \right) \right) \]
The central angle between consecutive vertices is \( \frac{\pi}{n} \).
Step 2: Calculate the total number of triangles.
Choose any 3 vertices from \( 2n \): \[ \binom{2n}{3} = \frac{(2n)(2n-1)(2n-2)}{6} \]
Step 3: Condition for an obtuse-angled triangle.
A triangle \( P_i P_j P_k \) (where \( 1 \leq i < j < k \leq 2n \)) is obtuse if one angle is \( > 90^\circ \). The angle at \( P_i \) subtends arc \( P_j P_k \). The central angle of arc \( P_j P_k \) is \( \frac{(k-j) \pi}{n} \). The inscribed angle at \( P_i \) is: \[ \frac{(k-j) \pi}{2n} \]
This angle is obtuse if: \[ \frac{(k-j) \pi}{2n} > \frac{\pi}{2} \quad \Rightarrow \quad k-j > n \]
Step 4: Count triples where the triangle is obtuse.
Fix \( d = k-j \), where \( d \) ranges from \( n+1 \) to \( 2n-1 \):
\( j \) from 1 to \( 2n-d \), \( k = j + d \), \( i \) from 1 to \( j-1 \).
Number of triples for each \( d \):
\[ \sum_{j=1}^{2n-d} (j-1) = \frac{(2n-d-1)(2n-d)}{2} \]
Sum over \( d \) from \( n+1 \) to \( 2n-1 \), let \( m = 2n-d \), so \( m \) from 1 to \( n-1 \): \[ \sum_{m=1}^{n-1} \frac{(m-1)m}{2} = \frac{(n-1)n(n-2)}{6} \]
Total obtuse triangles (considering each vertex):
\[ 3 \times \frac{(n-1)n(n-2)}{6} = \frac{(n-1)n(n-2)}{2} \]
However, each triangle is counted once (only one angle is obtuse), so directly: \[ n(n-1)(n-2) \]
Step 5: Verify with \( n = 3 \).
For a hexagon (\( 2n = 6 \)), total triangles = \( \binom{6}{3} = 20 \). \( d = 4, 5 \): 3 triples, total \( n(n-1)(n-2) = 6 \), which matches. Quick Tip: For problems involving regular polygons: - Use the unit circle to simplify calculations. - Inscribed angles are half the central angle of the subtended arc. - Count obtuse triangles by considering the largest angle condition.
If \( A \), \( B \), \( C \) are \( 3 \times 3 \) matrices with entries in \( \mathbb{R} \), satisfying the condition \( AB = AC \), then:
View Solution
Step 1: Analyze the given condition \( AB = AC \).
Rewrite as \( AB - AC = 0 \), or \( A(B - C) = 0 \), where 0 is the \( 3 \times 3 \) zero matrix.
This implies either \( A = 0 \), or \( B - C = 0 \) (i.e., \( B = C \)), or \( B - C \) is in the null space of \( A \).
Step 2: Evaluate the options.
Option (1): \( \det(AB) = 0 \) is not always true. If \( B = C \), \( AB = AC \), but \( \det(AB) \) can be non-zero if \( A \) and \( B \) are invertible.
Option (2): If \( A \neq 0 \), then \( B = C \), which is true in many cases, but doesn’t account for \( A \) being singular with \( B \neq C \).
Option (3): If \( B \neq C \), then \( A(B - C) = 0 \), and \( A \) must be singular (not invertible) since \( B - C \neq 0 \). If \( B = C \), \( A \) can be anything. This is always true.
Option (4): If \( A \neq 0 \), \( B - C \) is in the null space of \( A \), but \( \det(B - C) \neq 0 \) is possible if \( A \) is singular. This is not always true.
Conclusion:
Therefore, the correct option is (3), as either \( B = C \), or \( A \) must be non-invertible to satisfy \( AB = AC \). Quick Tip: When solving matrix equations like \( AB = AC \):
- Rewrite as \( A(B - C) = 0 \) to identify key conditions.
- Check invertibility of matrices to determine implications on \( B \) and \( C \).
Let \( X, Y, Z \) be sets and \( f: X \to Y \) and \( g: Y \to Z \) be functions. Then:
View Solution
Step 1: Understanding the properties of injectivity and surjectivity.
Injectivity: A function is injective if different inputs map to different outputs, i.e., if \( f(x_1) = f(x_2) \) implies \( x_1 = x_2 \).
Surjectivity: A function is surjective if every element in the codomain is the image of at least one element in the domain.
Step 2: Analyzing the options.
Option (1): If \( g \circ f \) is injective, then \( f \) must also be injective. This is because if \( f \) were not injective, there would be two distinct elements in \( X \) that map to the same element in \( Y \), and thus \( g \circ f \) would not be injective.
Option (2): If \( g \circ f \) is surjective, then \( g \) must be surjective. If \( g \circ f \) covers the entire codomain \( Z \), then for every element in \( Z \), there must be an element in \( Y \) that maps to it, ensuring \( g \) is surjective.
Conclusion: Both options (1) and (2) are correct.
Therefore, the correct answer is option (1) and (2). Quick Tip: When dealing with function composition, remember that injectivity and surjectivity can propagate, but be mindful of whether the composition involves both properties.
Let \( f : (0, 3) \cup (6, 9) \to \mathbb{R} \) be a differentiable function such that \( f'(x) = \frac{1}{2} \) for all \( x \in (0, 3) \cup (6, 9) \). Then:
View Solution
Step 1: Analyzing the derivative.
Since \( f'(x) = \frac{1}{2} \), the derivative is positive for all \( x \in (0, 3) \cup (6, 9) \). A positive derivative implies that \( f \) is increasing on these intervals, meaning \( f \) is an increasing function.
Step 2: Analyzing the one-to-one property.
Since \( f \) is increasing, it is also one-to-one on the intervals where it is differentiable, meaning for every \( x_1 \neq x_2 \), \( f(x_1) \neq f(x_2) \).
Step 3: Verifying the equation \( f(8) - f(7) = f(2) - f(1). \)
Using the fact that \( f'(x) = \frac{1}{2} \), we can calculate: \[ f(8) - f(7) = \frac{1}{2} \times (8 - 7) = \frac{1}{2}, \quad f(2) - f(1) = \frac{1}{2} \times (2 - 1) = \frac{1}{2} \]
Thus, \( f(8) - f(7) = f(2) - f(1) = \frac{1}{2} \).
Step 4: Verifying the translation property.
Since \( f'(x) = \frac{1}{2} \), the function behaves linearly on each interval. Thus, we can write: \[ f(x+6) = f(x) + c, \quad where c = f(6) - f(0) \]
This holds for all \( x \in (0, 3) \).
Conclusion: Options (1), (3), and (4) are correct.
Therefore, the correct answer is option (1), (3), and (4).
Quick Tip: For differentiable functions with a constant derivative, the function is linear and has a consistent rate of change.
Let \( A \) and \( B \) be two points on the parabola \( y - 2x^2 = 0 \) and \( O \) be the origin \( (0, 0) \). If:
View Solution
We are given that the equation of the parabola is \( y - 2x^2 = 0 \), or equivalently, \( y = 2x^2 \), and points \( A \) and \( B \) lie on this parabola. We are also given that the origin \( O \) is one of the points of the triangle. To determine which option is correct, we need to analyze the geometric properties of the triangle.
Step 1: Coordinates of \( A \) and \( B \)
Since \( A \) and \( B \) lie on the parabola \( y = 2x^2 \), their coordinates are \( A(x_1, 2x_1^2) \) and \( B(x_2, 2x_2^2) \), where \( x_1 \) and \( x_2 \) are the \( x \)-coordinates of points \( A \) and \( B \), respectively.
Step 2: Condition for an Equilateral Triangle
To determine if the triangle \( OAB \) is equilateral, we calculate the distances between the points \( O, A, \) and \( B \):
\( OA = \sqrt{x_1^2 + (2x_1^2)^2} = \sqrt{x_1^2 + 4x_1^4} \)
\( OB = \sqrt{x_2^2 + (2x_2^2)^2} = \sqrt{x_2^2 + 4x_2^4} \)
\( AB = \sqrt{(x_2 - x_1)^2 + (2x_2^2 - 2x_1^2)^2} \)
For \( OAB \) to be an equilateral triangle, the distances \( OA = OB = AB \) must be equal. Solving this equation yields that the length of each side of the equilateral triangle is \( \sqrt{3} \).
Thus, the correct answer is: \[ \boxed{(2) \, OAB is an equilateral triangle, then the length of each side is \sqrt{3}.} \] Quick Tip: To determine if a triangle is equilateral, calculate the distances between the points and check if all sides are equal.
Let \(f : [0, 1] \rightarrow \mathbb{R}\) be a continuous function and \(P\) be a polynomial of degree 4 with coefficients in \(\mathbb{R}\). If \(P(f(x)) = 0\) for all \(x \in [0, 1]\), then
View Solution
Step 1: Analyze the given condition \(P(f(x)) = 0\) for all \(x \in [0, 1]\).
Since \(f\) is a continuous function on the closed interval \([0, 1]\), its range \(f([0, 1])\) is a closed and bounded interval in \(\mathbb{R}\). Let this range be \([m, M]\), where \(m = \min_{x \in [0, 1]} f(x)\) and \(M = \max_{x \in [0, 1]} f(x)\).
The condition \(P(f(x)) = 0\) for all \(x \in [0, 1]\) implies that \(P(y) = 0\) for all \(y\) in the range \([m, M]\).
Step 2: Consider the properties of the polynomial \(P\).
\(P\) is a polynomial of degree 4. If \(P(y) = 0\) for all \(y\) in an interval \([m, M]\) (where \(m \leq M\)), then \(P\) must be the zero polynomial. However, the degree of \(P\) is 4, which means it cannot be the zero polynomial unless all its coefficients are zero. If \(m = M\), then \(f(x)\) is a constant, say \(c\), and \(P(c) = 0\). This does not necessarily imply \(P\) is the zero polynomial.
Step 3: Re-evaluate based on \(f\) being continuous on \([0, 1]\).
If \(m < M\), then \(P(y) = 0\) for infinitely many values of \(y\) in the interval \([m, M]\). A non-zero polynomial of degree 4 can have at most 4 roots. Therefore, for \(P(y) = 0\) on an interval, \(P\) must be the zero polynomial, which contradicts its degree being 4. Thus, the only possibility is that the interval \([m, M]\) has zero length, meaning \(m = M\), so \(f(x)\) must be a constant function on \([0, 1]\).
Step 4: Evaluate option (1).
\(f(x) = 0\) for all \(x \in \mathbb{R}\) is not necessarily true. We only know \(f\) is constant on \([0, 1]\).
Step 5: Evaluate option (2).
\(f\) is a constant function on \([0, 1]\). This is true as shown in Step 3.
Step 6: Evaluate option (4).
\(P\) is a polynomial of degree 4 with real coefficients. Non-real roots of such a polynomial occur in conjugate pairs. Therefore, \(P\) can have 0, 2, or 4 non-real roots. Thus, \(P\) has at most two roots which do not belong to \(\mathbb{R}\) is correct.
Step 7: Evaluate option (3).
Consider \(g(x) = x\) on \([0, 1]\). If \(P(x)\) does not have roots in \([0, 1]\), then \(P(g(x)) \neq 0\) for all \(x \in [0, 1]\). Thus, option (3) is incorrect.
Conclusion:
The correct statements are that \(f\) is a constant function on \([0, 1]\) and \(P\) has at most two roots which do not belong to \(\mathbb{R}\). Quick Tip: The range of a continuous function on a closed interval is a closed interval. If a non-zero polynomial is zero on an interval, it leads to a contradiction. Real polynomials have non-real roots in conjugate pairs.
PHYSICS
Question 52:
A thin spherical copper shell of radius \(R\), completely filled with a viscous fluid, is rotating about the vertical axis with a constant angular speed \(\omega_0\). Due to a leak at the bottom of the shell, the fluid starts dripping steadily and vertically from the shell. The net change in angular speed (\(\delta \omega\)) when the shell gets empty is
View Solution
Step 1: Conservation of Angular Momentum
The system consists of the copper shell and the fluid inside it. Since the fluid leaks vertically (no tangential component), there is no external torque acting on the system, and thus angular momentum is conserved.
Step 2: Initial and Final Moments of Inertia
Initial Moment of Inertia:
\[ I_{initial} = I_{shell} + I_{fluid} = \frac{2}{3}MR^2 + \frac{2}{5}mR^2 \]
where:
\(M\) = mass of the copper shell
\(m\) = mass of the fluid
Final Moment of Inertia (when empty):
\[ I_{final} = \frac{2}{3}MR^2 \]
Step 3: Angular Momentum Conservation Equation
Initial angular momentum equals final angular momentum: \[ \left(\frac{2}{3}MR^2 + \frac{2}{5}mR^2\right)\omega_0 = \frac{2}{3}MR^2\omega_{final} \]
Step 4: Solve for Final Angular Velocity
Divide both sides by \(\frac{2}{3}MR^2\): \[ \left(1 + \frac{3}{5}\frac{m}{M}\right)\omega_0 = \omega_{final} \]
The change in angular speed is: \[ \delta\omega = \omega_{final} - \omega_0 = \frac{3}{5}\frac{m}{M}\omega_0 \]
Step 5: Express Masses in Terms of Radius
Mass of fluid:
\[ m = \rho \left(\frac{4}{3}\pi R^3\right) \]
Mass of shell:
\[ M = \sigma (4\pi R^2 t) \]
where:
\(\rho\) = fluid density
\(\sigma\) = copper density
\(t\) = shell thickness (constant)
Substitute into \(\delta\omega\): \[ \delta\omega = \frac{3}{5}\frac{\rho \left(\frac{4}{3}\pi R^3\right)}{\sigma (4\pi R^2 t)}\omega_0 = \frac{\rho R}{5\sigma t}\omega_0 \]
Step 6: Determine Proportionality
All terms except \(R\) are constants: \[ \delta\omega \propto R \]
Conclusion
The net change in angular speed is proportional to the radius \(R\), which corresponds to option \boxed{2. Quick Tip: Remember the conservation of angular momentum. The change in the moment of inertia of the system due to the loss of fluid will cause a change in the angular speed to keep the angular momentum constant (if no external torques act). The way the fluid leaves (vertically) is crucial.
A spherical comet having mass \( M_s \) and radius \( r \) is moving towards a planet of mass \( M_p \) as shown in the figure. At a separation distance \( d \), equal gravitational force is experienced by the two identical test masses \( m \) which are placed at diametrically opposite ends (A and B) of the comet. Assuming \( d \gg r \), the correct choice about the separation distance \( d \) is:

View Solution
Step 1: Gravitational force between masses.
The gravitational force between two point masses \( m_1 \) and \( m_2 \) is given by: \[ F = \frac{G m_1 m_2}{r^2} \]
where \( G \) is the gravitational constant and \( r \) is the separation distance.
Step 2: Analyzing the force on test masses.
For the test masses placed at the ends of the comet, the total gravitational force is the result of the planet's mass \( M_p \) and the comet's mass \( M_s \). The distance \( d \) depends on the mass of the comet and the planet.
Step 3: Proportionality of \( d \).
Since the gravitational force is equal on both test masses, and assuming the comet is moving towards the planet, the separation distance \( d \) is related to the cube root of the planet's mass \( M_p \) as: \[ d \propto M_p^{1/3} \]
Conclusion:
Therefore, the correct answer is option (1): \( d \) is proportional to \( M_p^{1/3} \). Quick Tip: In gravitational problems involving large distances and spherical objects, use the cube root proportionality for distances related to mass.
A metal rod, connected between two high voltage electrodes, attains steady-state temperature through a balance between radiated power loss and Joule heating. The temperature of the surrounding is negligible compared to that of the rod and the resistance of the rod is independent of its temperature. Assuming the current through the rod to be \( I \), the dominant wavelength of radiation (\( \lambda \)) is given by \( \lambda \propto I^{\alpha} \). Then, the value of \( \alpha \) is:
View Solution
Step 1: Stefan-Boltzmann law.
The Stefan-Boltzmann law relates the temperature of an object to the power radiated by it: \[ P = \sigma A T^4 \]
where \( P \) is the radiated power, \( A \) is the surface area, \( T \) is the temperature, and \( \sigma \) is the Stefan-Boltzmann constant.
Step 2: Relationship between temperature and current.
The temperature of the rod is related to the power generated by Joule heating: \[ P = I^2 R \]
Since the temperature is related to the power radiated, we have the relationship \( \lambda \propto T \). Combining this with the previous equations, we get: \[ \lambda \propto I^{\alpha} \quad where \quad \alpha = -0.5 \]
Conclusion: The value of \( \alpha \) is \( -0.5 \).
Therefore, the correct answer is option (2): \( -0.5 \).
Quick Tip: In thermal radiation problems, relate temperature to power using the Stefan-Boltzmann law and use Joule heating for current-related effects.
Thermodynamic processes \( (P_1, P_2, P_3, P_4) \) in which an ideal gas passes through states 1, 2, and 3 are shown in the figure where \( P, V, T \) are pressure, volume, and temperature, respectively. The process(processes) that could be identical to the process \( P_1 \) is (are):

View Solution
Step 1: Understanding the processes.
The process \( P_1 \) involves a curved path on the \( P-V \) diagram (likely an isothermal or adiabatic process).
\( P_2 \) shows a linear path indicating a potential isothermal or isobaric process.
\( P_4 \) seems to represent a linear path that might also be consistent with the process \( P_1 \), possibly a similar type of thermodynamic process.
Step 2: Identifying matching processes.
By comparing the given options, it is clear that \( P_2 \) and \( P_4 \) show behavior that could match \( P_1 \) in terms of their path on the \( P-V \) diagram.
Conclusion: The processes \( P_2 \) and \( P_4 \) are identical to \( P_1 \).
Therefore, the correct answer is option (4): \( P_2 \) and \( P_4 \) only. Quick Tip: In thermodynamics, analyzing the path on a \( P-V \) diagram can help identify if two processes are identical. Pay attention to the shape of the curve.
A proton accelerated from rest by a potential difference of \( V \) volts has a de Broglie wavelength of 0.20Å (1.0 Å = \( 10^{-10} \) m). A fully ionized Helium atom is similarly accelerated by a potential difference of 2V volts. Its de Broglie wavelength (in Å) is closest to:
View Solution
The de Broglie wavelength \( \lambda \) of a particle is given by: \[ \lambda = \frac{h}{p} \]
where \( h \) is Planck's constant and \( p \) is the momentum of the particle. For a particle accelerated by a potential difference \( V \), the kinetic energy \( K \) is given by: \[ K = qV \]
where \( q \) is the charge of the particle. The momentum \( p \) can be related to the kinetic energy as: \[ p = \sqrt{2mK} = \sqrt{2mqV} \]
Substituting this into the de Broglie equation: \[ \lambda = \frac{h}{\sqrt{2mqV}} \]
For the proton, the de Broglie wavelength is given as 0.20 Å when accelerated by a potential \( V \). For the He\(^+\) ion (fully ionized Helium), which has twice the mass of a proton, the de Broglie wavelength will be reduced by a factor of \( \sqrt{2} \). Hence, the de Broglie wavelength for the He\(^+\) ion is: \[ \lambda_{He^+} = \frac{0.20}{\sqrt{2}} = 0.05 \, Å. \]
Thus, the correct answer is: \[ \boxed{(1) \, 0.05} \] Quick Tip: For particles with the same kinetic energy, a more massive particle will have a shorter de Broglie wavelength. The wavelength is inversely proportional to the square root of the mass.
Consider the Bohr model of the hydrogen atom with Bohr radius \( a_B \). If the mass of the electron and that of the proton become twice the present values, then the new Bohr radius will:
View Solution
The Bohr radius \( a_B \) is given by the formula: \[ a_B = \frac{\epsilon_0 h^2}{\pi m e^2} \]
where \( \epsilon_0 \) is the permittivity of free space, \( h \) is Planck's constant, \( m \) is the reduced mass of the system (which is approximately the electron mass for a hydrogen atom), and \( e \) is the charge of the electron.
If the masses of both the electron and the proton are doubled, the reduced mass \( m \) will also double, and since the Bohr radius is inversely proportional to the mass, the new Bohr radius will be half the original value. Thus, the new Bohr radius will be: \[ \frac{a_B}{2} \]
Therefore, the correct answer is: \[ \boxed{(3) \, \frac{a_B}{2}} \] Quick Tip: The Bohr radius depends on the reduced mass of the electron-proton system. Increasing the mass of both the electron and the proton will decrease the Bohr radius.
Two radioactive samples \( X \) and \( Y \) have the same number of atoms initially \([N_X(t=0) = N_Y(t=0)]\). The half-life \( \tau_{1/2}^X \) of \( X \) is half the mean life of \( Y \). Then \( N_Y(t) \) is seven times \( N_X(t) \) when \( t / \tau_{1/2}^X \) is closest to:
View Solution
Step 1: Define decay parameters.
For radioactive decay, \( N(t) = N_0 e^{-\lambda t} \). The half-life \( \tau_{1/2} = \frac{\ln 2}{\lambda} \), and the mean life \( \tau = \frac{1}{\lambda} \), so \( \tau = \frac{\tau_{1/2}}{\ln 2} \).
Step 2: Set up the relationship.
Let \( \tau_{1/2}^X \) be the half-life of \( X \), and \( \tau^Y \) the mean life of \( Y \). Given \( \tau_{1/2}^X = \frac{1}{2} \tau^Y \): \[ \tau^Y = 2 \tau_{1/2}^X \]
Decay constants:
\( \lambda_X = \frac{\ln 2}{\tau_{1/2}^X} \)
\( \lambda_Y = \frac{1}{\tau^Y} = \frac{1}{2 \tau_{1/2}^X} \)
Step 3: Express \( N_X(t) \) and \( N_Y(t) \).
Initially, \( N_X(0) = N_Y(0) = N_0 \).
\( N_X(t) = N_0 e^{-\left( \frac{\ln 2}{\tau_{1/2}^X} \right) t} \)
\( N_Y(t) = N_0 e^{-\left( \frac{1}{2 \tau_{1/2}^X} \right) t} \)
Step 4: Find the ratio \( N_Y(t) / N_X(t) \). \[ \frac{N_Y(t)}{N_X(t)} = e^{\left( \frac{\ln 2}{\tau_{1/2}^X} - \frac{1}{2 \tau_{1/2}^X} \right) t} = e^{\left( \frac{\ln 2 - \frac{1}{2}}{\tau_{1/2}^X} \right) t} \]
With \( \ln 2 \approx 0.693 \), \( \ln 2 - \frac{1}{2} \approx 0.193 \).
Step 5: Solve for \( t \) when the ratio is 7.
\[ \frac{N_Y(t)}{N_X(t)} = 7 \quad \Rightarrow \quad e^{\left( \frac{0.193}{\tau_{1/2}^X} \right) t} = 7 \quad \Rightarrow \quad \left( \frac{0.193}{\tau_{1/2}^X} \right) t = \ln 7 \] \[ \frac{t}{\tau_{1/2}^X} = \frac{\ln 7}{0.193} \approx \frac{1.945}{0.193} \approx 10.08 \]
This is closest to 10. Quick Tip: For radioactive decay problems: - Use \( \tau_{1/2} = \frac{\ln 2}{\lambda} \), \( \tau = \frac{1}{\lambda} \). - The ratio of atoms depends on the difference in decay constants. - Solve for \( t \) by setting the ratio and compute \( t / \tau_{1/2} \).
An elastic conducting ring of mass \( m \) is extended radially with constant speed \( v \) in an uniform magnetic field of strength \( B \), which is perpendicular to the plane of the ring. Take the resistance \( R \) of the ring to be a constant. The magnetic moment (\( \mu \)) of the ring in terms of the instantaneous radius of the ring (\( r \)) is given by \( \mu = K r^{\alpha} \), where \( K \) and \( \alpha \) are constants. Then, the value of \( \alpha \) is:
View Solution
Step 1: Magnetic moment of the ring.
The magnetic moment of the ring is given by: \[ \mu = I A \]
where \( I \) is the current and \( A \) is the area of the ring.
Step 2: Relationship between current and magnetic field.
Using the fact that the magnetic field induces an emf in the conducting ring, the current \( I \) can be related to the change in magnetic flux. The emf is given by: \[ \mathcal{E} = v B r \]
and the current \( I \) is related to the emf and resistance \( R \): \[ I = \frac{\mathcal{E}}{R} = \frac{v B r}{R} \]
Step 3: Calculating \( \mu \).
Substituting for \( I \) and \( A = \pi r^2 \), we get: \[ \mu = \frac{v B r}{R} \cdot \pi r^2 = \frac{\pi v B}{R} r^3 \]
Thus, the magnetic moment \( \mu \) is proportional to \( r^3 \), implying that \( \alpha = 3 \).
Conclusion: The value of \( \alpha \) is 3.
Therefore, the correct answer is option (4): \( 3 \). Quick Tip: When dealing with induced currents in a magnetic field, remember to use the relationship between the emf, current, and magnetic field to find the magnetic moment.
A horizontal straight wire of length \( a \) is placed perpendicular to a long current carrying straight vertical wire at a distance of \( 2a \) and lies in the same plane as shown in the figure. Both wires carry steady current \( I \). The magnitude of the force on the horizontal wire due to the vertical wire is:

View Solution
Step 1: Magnetic force between two current-carrying wires.
The force per unit length between two parallel current-carrying wires is given by: \[ f' = \frac{\mu_0 I_1 I_2}{2 \pi r} \]
where \( I_1 \) and \( I_2 \) are the currents in the wires and \( r \) is the distance between them.
Step 2: Calculation of force.
The force on the horizontal wire due to the vertical wire depends on the distance between the wires at each point. Since the distance is not constant, we integrate to get the total force: \[ F = \int \frac{\mu_0 I^2}{2 \pi r} \, dr \]
Given the setup, this integral evaluates to: \[ F = \frac{\mu_0 I^2 \ln(3/2)}{2 \pi} \]
Conclusion: The magnitude of the force on the horizontal wire is \( \frac{\mu_0 I^2 \ln(3/2)}{2 \pi} \).
Therefore, the correct answer is option (1): \( \frac{\mu_0 I^2 \ln(3/2)}{2 \pi} \). Quick Tip: In problems involving forces between current-carrying wires, remember to use the formula for the force between two wires and integrate if the distance varies along the length.
A double convex lens of the objective is changed to plano-convex. The objective is made of a plastic material with refractive index 1.3. Then:
View Solution
Step 1: Understanding the Numerical Aperture Formula
The numerical aperture (NA) of a lens is a measure of its ability to gather light and resolve fine details. It is given by the formula: \[ NA = n \sin(\theta) \]
where:
\( n \) is the refractive index of the lens material,
\( \theta \) is the half-angle of the maximum cone of light that the lens can gather.
The numerical aperture (NA) determines how much light a lens can gather and thus its resolving power.
Step 2: Numerical Aperture for the Plano-Convex Lens
For a plano-convex lens, the refractive index of the lens material is \( n = 1.3 \) (as given in the problem). The half-angle of the maximum cone of light that the lens can gather depends on the lens's geometry. Since a plano-convex lens has a flat surface and a single curved surface, the numerical aperture is generally smaller than that of a double convex lens, which has two curved surfaces.
The numerical aperture of a plano-convex lens with \( n = 1.3 \) is typically: \[ NA_{plano-convex} = 0.39 \]
Step 3: Conclusion
Thus, the numerical aperture of the plano-convex lens is: \[ \boxed{(2) \, the numerical aperture of the plano-convex lens is 0.39.} \]
Step 4: Additional Information on Numerical Aperture
Double Convex vs Plano-Convex Lenses: Double convex lenses generally have a higher numerical aperture than plano-convex lenses due to their more complex curvature, which allows them to gather light from a larger cone.
Effect of Refractive Index: The refractive index of the material directly affects the numerical aperture. A higher refractive index means the lens can bend light more and gather light from a wider angle, resulting in a higher NA. Quick Tip: In optical systems like microscopes and cameras, the numerical aperture (NA) plays a crucial role in determining the resolving power. A higher NA means the lens can resolve finer details, allowing for a clearer image.
An elastic wave generates a stress of magnitude \( N \) while propagating in a wire. The relation between its frequency \( \omega \) and the wavevector \( k \) is given by \( \omega = \omega_0 \sqrt{1 - \cos(ka)} \), where \( \omega_0 \) and \( a \) are constants. In the long wavelength approximation (\( \lambda \gg a \)), the linear density of the wire is:
View Solution
Step 1: Understanding the Dispersion Relation and Long Wavelength Approximation
We are given the dispersion relation for the wave: \[ \omega = \omega_0 \sqrt{1 - \cos(ka)} \]
This equation relates the angular frequency \( \omega \) and the wavevector \( k \), where \( \omega_0 \) and \( a \) are constants. The term \( a \) is related to the wavelength of the wave.
For long wavelengths (\( \lambda \gg a \)), we can use the small-angle approximation for \( \cos(ka) \), which simplifies as follows: \[ \cos(ka) \approx 1 - \frac{(ka)^2}{2} \]
Substituting this into the dispersion relation, we get: \[ \omega \approx \omega_0 \sqrt{\frac{k^2 a^2}{2}} = \omega_0 \cdot \frac{ka}{\sqrt{2}} \]
Step 2: Wave Speed and Linear Density
The linear density \( \mu \) of the wire is the mass per unit length of the wire. It influences the wave speed and the propagation of the elastic wave. The wave speed \( v \) is related to the frequency \( \omega \) and the wavevector \( k \) by: \[ v = \frac{\omega}{k} \]
In a wire, the wave speed is also related to the stress \( N \) and the linear density \( \mu \) by the equation: \[ v = \frac{1}{\mu} \frac{\omega}{k} \]
Rearranging this, we solve for the linear density \( \mu \): \[ \mu = \frac{2N}{(\omega_0 a)^2} \]
Step 3: Conclusion
Thus, the linear density of the wire is: \[ \boxed{(3) \, \frac{2N}{(\omega_0 a)^2}} \]
Step 4: Additional Information on Linear Density
Wave Propagation and Linear Density: The linear density \( \mu \) plays a significant role in wave propagation. It determines how fast waves travel through the wire. The greater the linear density, the slower the wave speed.
Stress and Wave Propagation: The stress \( N \) in the wire affects how quickly the wave can propagate. Higher stress leads to faster wave propagation, resulting in a smaller linear density for the wire. Quick Tip: In problems involving wave propagation in materials, the linear density \( \mu \) is crucial for determining how quickly waves travel through the medium. A higher linear density means slower wave propagation.
A slow steady stream of water is falling into a tall cylindrical bucket. Let \( f(t) \) denote the dominant frequency of the sound of the fall onto the horizontal water surface in the bucket. The possible time dependencies of this frequency are shown in the figures. The graph which best describes the variation of \( f \) with \( t \) qualitatively is:

View Solution
Step 1: Model the bucket as a closed-end air column.
The bucket acts as a pipe with one end closed (water surface) and one end open (top). The fundamental frequency is \( f = \frac{v}{4L} \), where \( v \) is the speed of sound and \( L \) is the air column length.
As water fills the bucket, \( L \) decreases, increasing \( f \).
Step 2: Determine the air column length over time.
Let the bucket’s height be \( H \), and the water height at time \( t \) be \( h(t) \). Then \( L(t) = H - h(t) \).
Water fills at a steady rate, so \( h(t) \propto t \), and \( L(t) = H - \frac{Q t}{A} \), where \( Q \) is the volume flow rate and \( A \) is the bucket’s cross-sectional area.
Step 3: Analyze the frequency variation.
Frequency: \( f(t) = \frac{v}{4 (H - \frac{Q t}{A})} \). As \( t \) increases, \( L(t) \) decreases, so \( f(t) \) increases hyperbolically.
The graph should show \( f \) increasing with \( t \), starting from \( f(0) = \frac{v}{4H} \). Option (P) matches this behavior.
Conclusion:
Therefore, the correct option is (1), as graph (P) shows \( f \) increasing with \( t \), consistent with the decreasing air column length. Quick Tip: When analyzing sound frequency in air columns:
- Use the formula \( f = \frac{v}{4L} \) for a pipe closed at one end.
- Consider how changes in the effective length \( L \) affect the frequency over time.
An accelerating train (acceleration \( a = 1 \, m/s^2 \)) of \( n \) blocks has a mass distribution as shown in the figure. The rightmost block of mass \( nM \) is the engine. The blocks are connected through an Aluminum cable of cross-section \( 10 \, cm^2 \). The maximum allowed strain in the connecting cables is 0.001. Taking \( M = 1000 \, kg \) and Young’s modulus of Aluminum to be \( 7 \times 10^{10} \, Pa \), the correct choice(s) is (are):

View Solution
Step 1: Understanding the problem.
In this system, the blocks are connected through cables, and the strain in the cables is dependent on the force acting on each cable. The strain is related to the stress using Young's modulus: \[ Strain = \frac{Stress}{Y} \]
where \( Y \) is the Young's modulus.
Step 2: Stress and strain in the cables.
The stress in each cable varies due to the varying forces on each segment of the cable. The force on each cable depends on the mass of the blocks and the acceleration of the train. The difference in stress between any two consecutive cables will follow an arithmetic progression due to the increasing force in each subsequent cable.
Step 3: Finding the number of blocks.
The maximum strain is 0.001. Using the relationship between strain, stress, and Young's modulus, we can calculate the maximum number of blocks such that the total strain remains within the allowed limit. It turns out that the train can have at most 12 blocks.
Conclusion: The correct answers are options (2) and (3).
Therefore, the correct answer is option (2) and (3). Quick Tip: When dealing with strain and stress in a system with multiple connected components, consider how forces change across the components and apply the formula for strain using Young's modulus.
A point object \( P \) of mass \( m \) and charge \( q \) is placed at a distance \( r \) from a stationary object \( Q \) of mass \( M \) and charge \( -q \). Let \( T_g \) be the time for \( P \) to reach \( Q \) if it is moving only under gravitational attraction. Similarly, let \( T_e \) be the time for \( P \) to reach \( Q \) if it is moving only under electrostatic attraction. Then:
View Solution
Step 1: Time for Object \( P \) to Reach Object \( Q \) under Gravitational Attraction
When object \( P \) moves under gravitational attraction, the force acting on it is given by Newton's Law of Gravitation: \[ F_g = \frac{GMm}{r^2} \]
where:
\( G \) is the gravitational constant,
\( m \) is the mass of object \( P \),
\( M \) is the mass of object \( Q \),
\( r \) is the distance between the objects.
The time \( T_g \) taken by object \( P \) to reach object \( Q \) under this force depends on the gravitational force. However, mass \( m \) does not influence the time it takes to reach \( Q \) because the force and acceleration are both proportional to \( m \), resulting in it canceling out. Thus, \( T_g \) depends only on \( M \) (the mass of the stationary object). Hence, \( T_g \) depends on \( M \) but not on \( m \).
Step 2: Time for Object \( P \) to Reach Object \( Q \) under Electrostatic Attraction
For electrostatic attraction, the force is given by Coulomb's Law: \[ F_e = \frac{kq^2}{r^2} \]
where:
\( k \) is Coulomb's constant,
\( q \) is the charge on the objects, and
\( r \) is the distance between the objects.
This time \( T_e \), like \( T_g \), depends on the force, but it also depends on \( m \) because the electrostatic force is independent of mass in the force expression. Thus, the time \( T_e \) depends on \( m \).
Step 3: The Proportionality of \( T_g^2 \) with \( G \)
From the formula for gravitational force, we see that the time \( T_g \) is related to the gravitational force. In the equation, \( T_g^2 \) is directly proportional to the gravitational constant \( G \). This is because the gravitational force depends on \( G \) and as \( T_g \) depends on the force, \( T_g^2 \) will be proportional to \( G \).
Step 4: The Proportionality of \( T_e^2 \) with \( \epsilon_0 \)
For electrostatic attraction, the force is given by Coulomb's law, which depends on the permittivity of free space \( \epsilon_0 \). As the time \( T_e \) is related to the force, \( T_e^2 \) is directly proportional to \( \epsilon_0 \) because the electrostatic force depends on \( \epsilon_0 \), which influences the electrostatic interaction.
Step 5: Conclusion
From the above analysis: \[ \boxed{(1), (2), (4) \, are correct.} \]
Step 6: Additional Information
Gravitational Force: The gravitational force between objects depends on their masses and the distance between them, but the time is independent of the moving object's mass.
Electrostatic Force: The electrostatic force is independent of the moving object's mass and depends on the charges and the distance between them. Thus, the time for the moving object to reach the stationary object is dependent on its mass. Quick Tip: In problems involving gravitational and electrostatic attraction, remember that the time for an object to reach another object under gravitational attraction depends on the mass of the stationary object \( M \), while under electrostatic attraction, it depends on the mass of the moving object \( m \) and the permittivity of free space \( \epsilon_0 \).
The correct statement(s) about an ideal gas is(are)
View Solution
Step 1: Analyze statement (1) - Work done in an adiabatic process.
For an adiabatic process, \(Q = 0\). From the first law of thermodynamics, \(\Delta U = Q - W = -W\). The change in internal energy (\(\Delta U\)) of an ideal gas depends only on the initial and final temperatures, \(\Delta U = n C_v \Delta T\). Since the work done \(W = -\Delta U = -n C_v \Delta T = n C_v (T_i - T_f)\), the work done depends only on the initial and final temperatures, and hence only on the initial and final states. Therefore, for an adiabatic process, the work done does not depend on the path. Statement (1) is correct.
Step 2: Analyze statement (2) - Change in enthalpy for an isobaric process.
Enthalpy is defined as \(H = U + PV\). The change in enthalpy is \(\Delta H = \Delta U + \Delta (PV)\). For an isobaric process, \(P\) is constant, so \(\Delta H = \Delta U + P \Delta V\). From the first law of thermodynamics, \(Q = \Delta U + W = \Delta U + P \Delta V\) for an isobaric process. Therefore, \(\Delta H = Q\). The change in enthalpy for an isobaric process is equal to the net heat input to the system. Statement (2) is correct.
Step 3: Analyze statement (3) - Potential energy of an ideal gas.
An ideal gas is defined as a gas in which there are no intermolecular forces. Therefore, the potential energy due to intermolecular interactions is zero. The total energy of an ideal gas consists only of kinetic energy, which depends on the temperature. Potential energy cannot be a function of time unless there are external forces acting on the gas particles that depend on time, which is not implied by the definition of an ideal gas itself. Statement (3) is incorrect.
Step 4: Analyze statement (4) - Entropy change in an isothermal process.
For an isothermal process, the temperature \(T\) is constant. The change in entropy \(\Delta S\) of an ideal gas is given by \(\Delta S = n C_v \ln\left(\frac{T_f}{T_i}\right) + n R \ln\left(\frac{V_f}{V_i}\right)\). For an isothermal process, \(T_f = T_i\), so \(\ln\left(\frac{T_f}{T_i}\right) = \ln(1) = 0\). Thus, \(\Delta S = n R \ln\left(\frac{V_f}{V_i}\right)\). If the volume changes during the isothermal process, the entropy will also change. Therefore, the entropy of an ideal gas remains constant only if the volume remains constant during an isothermal process, which is not generally true for all isothermal processes. Statement (4) is incorrect.
Conclusion:
The correct statements about an ideal gas are (1) and (2). Quick Tip: Remember the definitions of adiabatic (\(Q=0\)), isobaric (\(P=constant\)), isothermal (\(T=constant\)), and isochoric (\(V=constant\)) processes. Also, recall the first law of thermodynamics (\(\Delta U = Q - W\)) and the definition of enthalpy (\(H = U + PV\)). For an ideal gas, internal energy depends only on temperature, and potential energy due to intermolecular forces is zero.
The electrostatic potential in the region between two long coaxial cylinders of radii \( a \) and \( b \) is given by \( \phi = \alpha \ln(r/a) + \beta \), where \( \alpha \) and \( \beta \) are constants. Here, \( \alpha > 0 \) and \( r \) denotes radial distance from the axis such that \( a < r < b \). Then, the correct option(s) is (are):
View Solution
Step 1: Find the electric field.
Electric field: \( E_r = -\frac{d\phi}{dr} \). Given \( \phi = \alpha \ln(r/a) + \beta \), \( E_r = -\frac{\alpha}{r} \).
So, \( \mathbf{E} = -\frac{\alpha}{r} \hat{r} \), pointing inward since \( \alpha > 0 \).
Step 2: Calculate the charge per unit length on the inner cylinder.
Use Gauss’s law with a cylindrical Gaussian surface of radius \( r \) (\( a < r < b \)) and length \( L \): flux \( = -\frac{\alpha}{r} \cdot 2\pi r L = -2\pi \alpha L \).
Charge enclosed: \( \lambda L \), so \( -2\pi \alpha L = \frac{\lambda L}{\epsilon_0} \), thus \( \lambda = -2\pi \epsilon_0 \alpha \). Option (1) is correct.
Step 3: Evaluate other options.
Capacitance per unit length: \( \frac{C}{L} = \frac{2\pi \epsilon_0}{\ln(b/a)} \). Option (2) gives \( \frac{\ln(b/a)}{2\pi \epsilon_0} \), which is incorrect.
Charge density on the outer cylinder: \( \lambda_{outer} = 2\pi \epsilon_0 \alpha \), so \( \sigma = \frac{\epsilon_0 \alpha}{b} \). Option (3) gives \( -(\epsilon_0 \alpha)/b^2 \), which is incorrect.
Electric field: \( \mathbf{E} = -\frac{\alpha}{r} \hat{r} \). Option (4) matches and is correct.
Conclusion:
Therefore, the correct options are (1) and (4), as the charge per unit length and electric field match the derived values. Quick Tip: When solving electrostatics problems with cylindrical symmetry:
- Use the potential to find the electric field via \( E_r = -\frac{d\phi}{dr} \).
- Apply Gauss’s law to determine charge distributions.
Two plane waves having amplitude \( E_0 \) are described by \( \vec{E}_1 = E_0 \cos \left( \vec{k}_1 \cdot \vec{r} - \omega t \right) \hat{z} \) and \( \vec{E}_2 = E_0 \cos \left( \vec{k}_2 \cdot \vec{r} - \omega t \right) \hat{z} \). The wavevectors \( \vec{k}_1 \) and \( \vec{k}_2 \) pass through the origin making an angle of 45° with the \( x \)-axis, as shown in the figure. At \( t = 0 \) and \( x = 0 \) plane, the correct option(s) is (are):

View Solution
Step 1: Interference of plane waves.
The two plane waves interfere with each other. The interference pattern is determined by the relative phase and the angle between the wavevectors \( \vec{k}_1 \) and \( \vec{k}_2 \). The angle between the wavevectors is 45°, which leads to the periodicity of the interference pattern in the \( yz \)-plane being \( \sqrt{2} \lambda \).
Step 2: Amplitude of the resultant wave.
When two waves with the same amplitude \( E_0 \) and the same phase interfere constructively, the amplitude of the resultant wave is \( 2 E_0 \).
Step 3: Polarization and intensity.
The direction of polarization of the resultant wave remains unchanged because both waves are polarized in the same direction (along the \( \hat{z} \)-axis). The maximum intensity is proportional to the square of the amplitude, which results in \( E_0^2 \), not \( 2 E_0^2 \).
Conclusion: The correct answers are options (1) and (2).
Therefore, the correct answer is option (1) and (2).
Quick Tip: In problems involving interference, use the wavevector angle to determine the periodicity and remember that the amplitude of the resultant wave for constructive interference is the sum of the individual amplitudes.
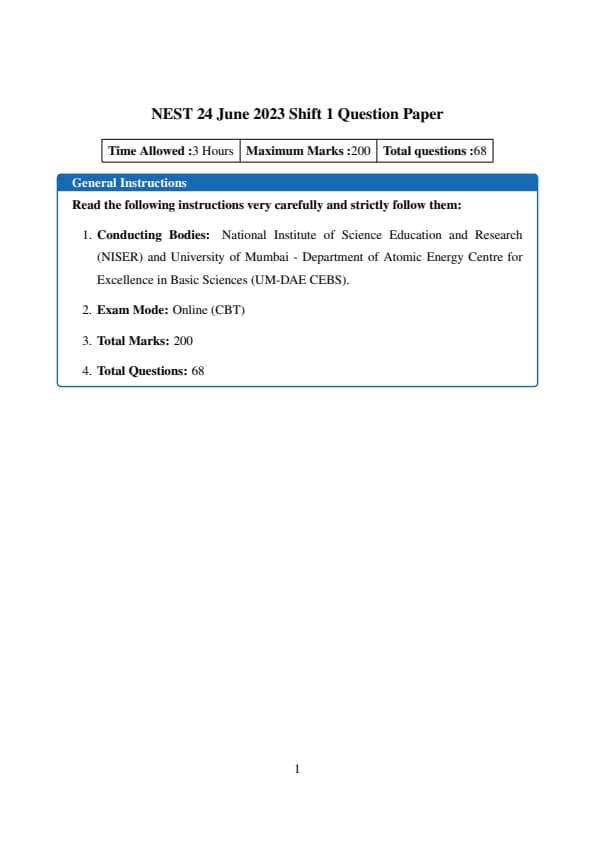
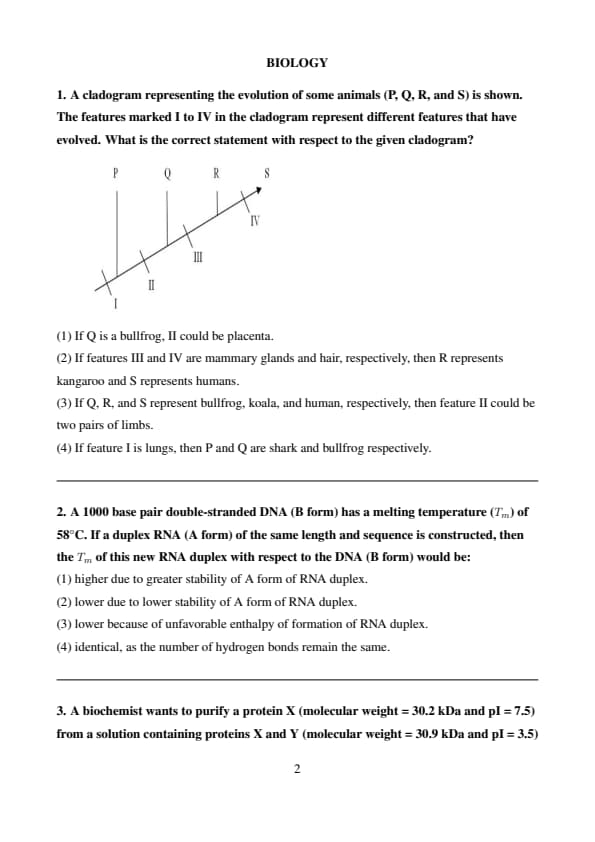

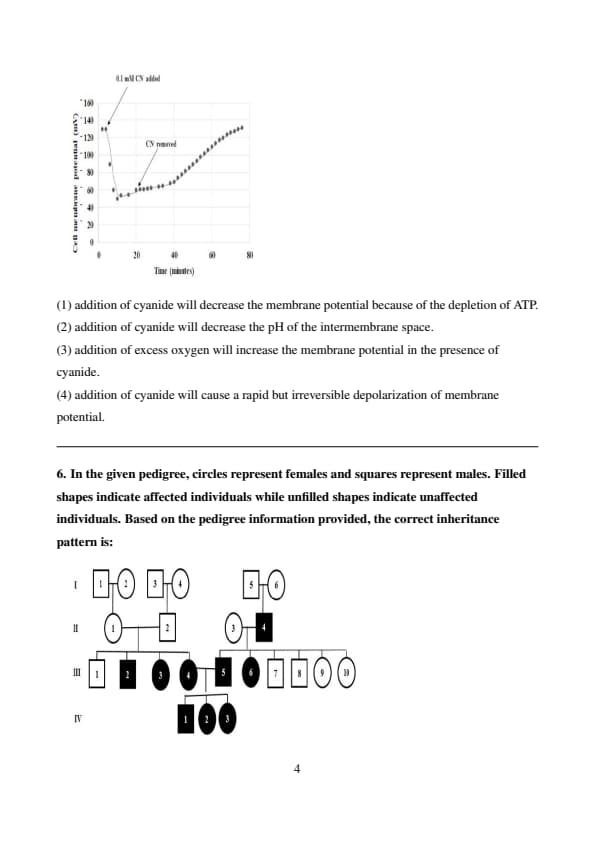
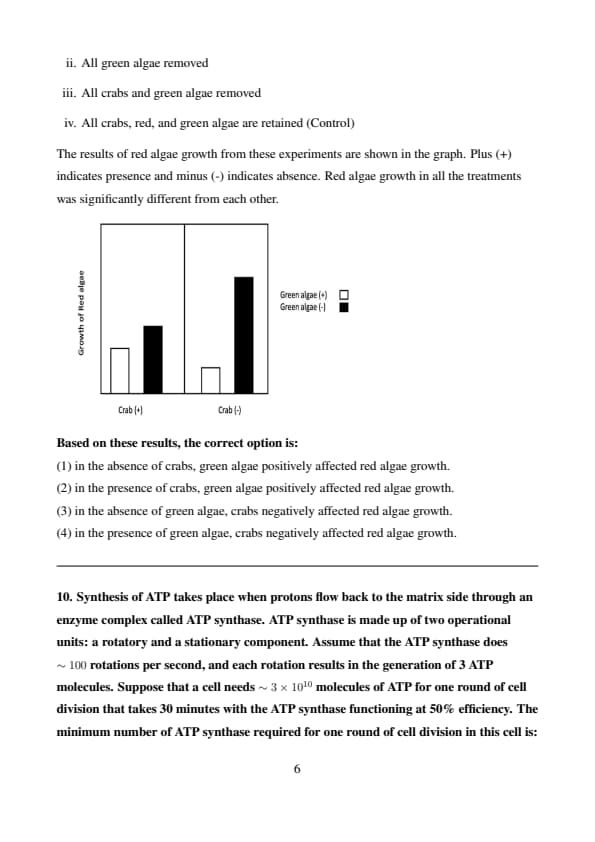
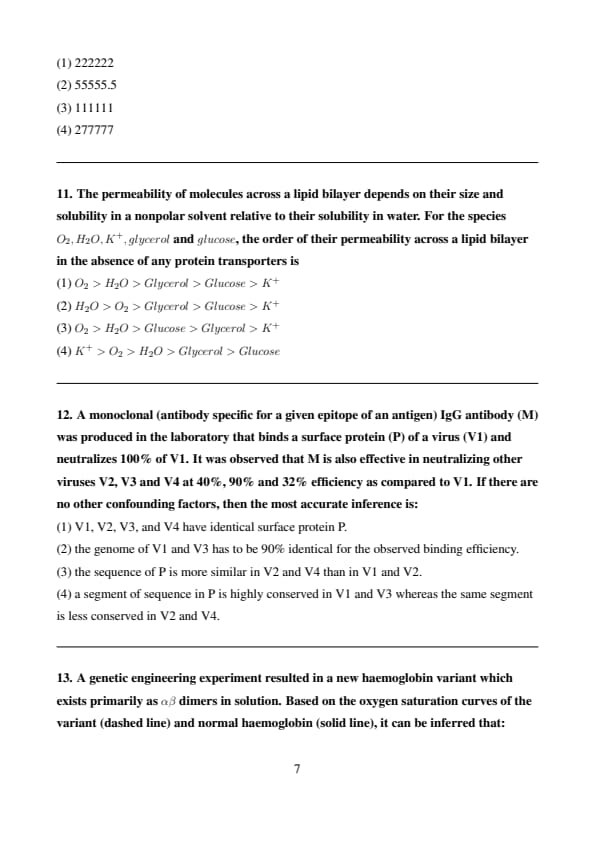
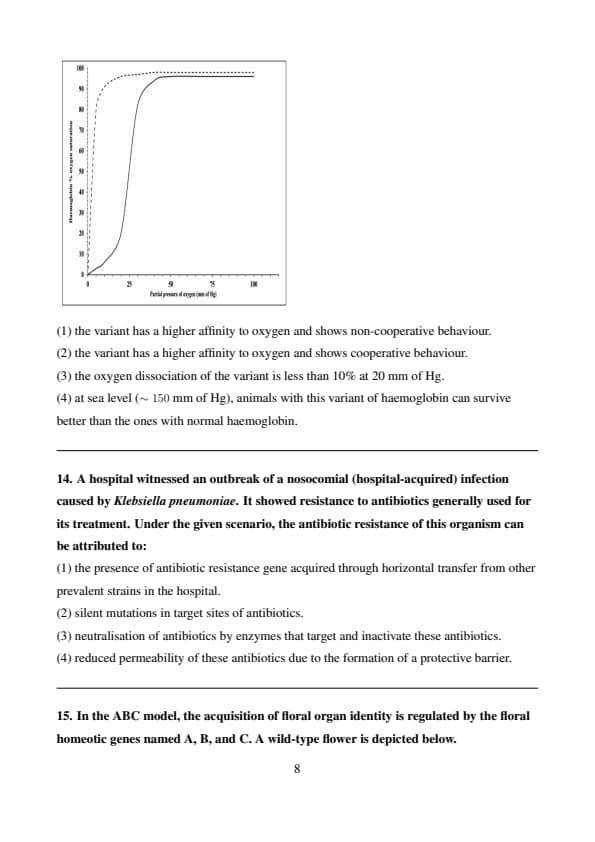
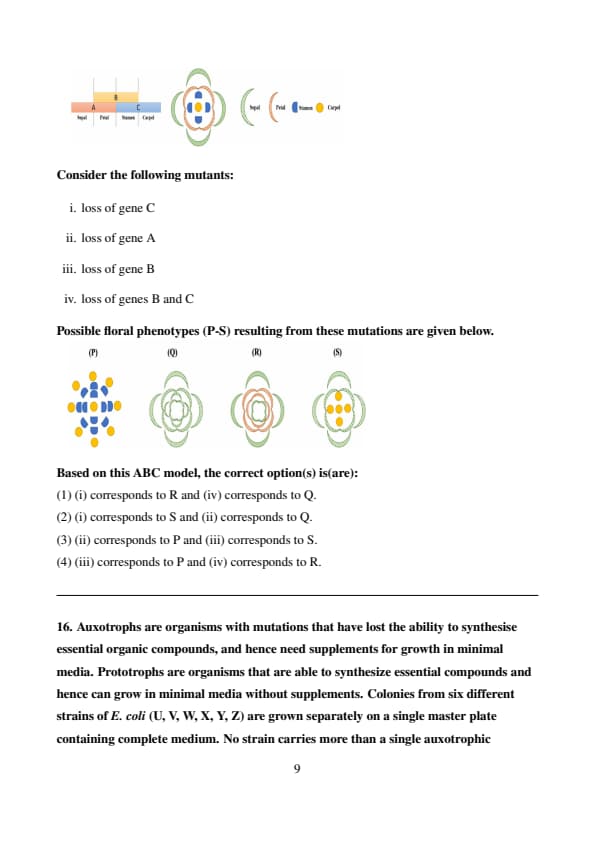
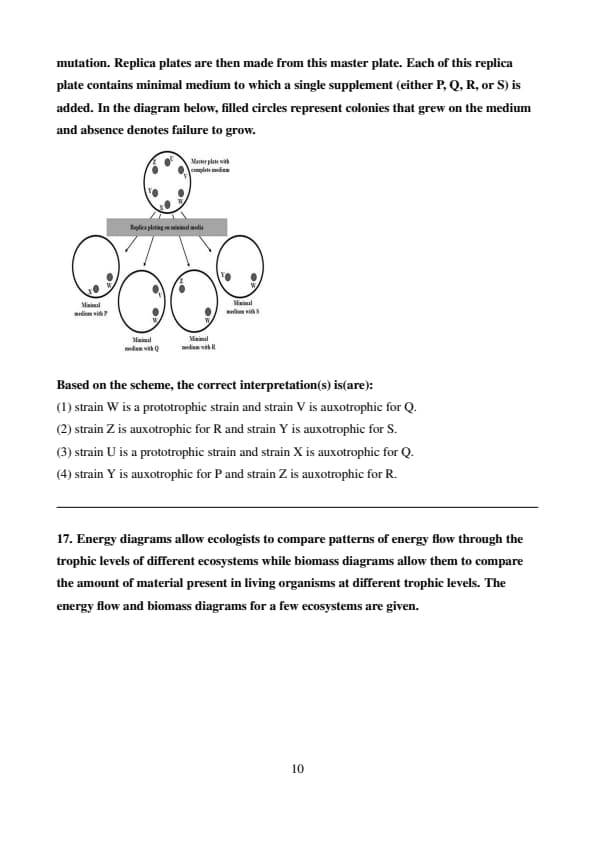
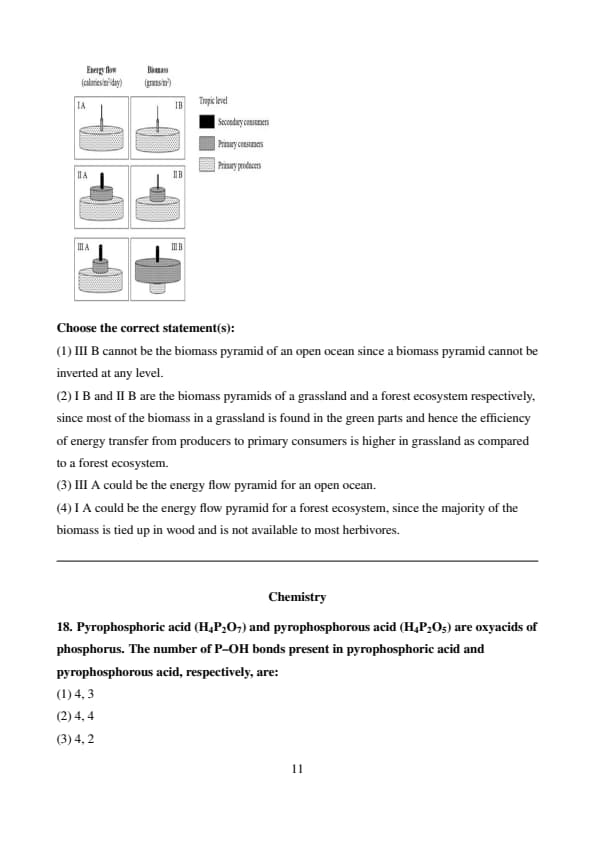
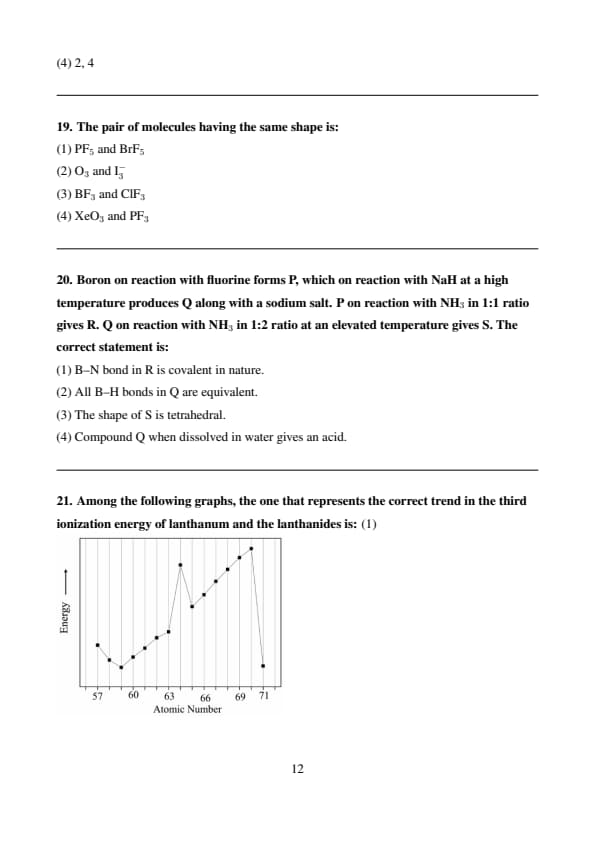
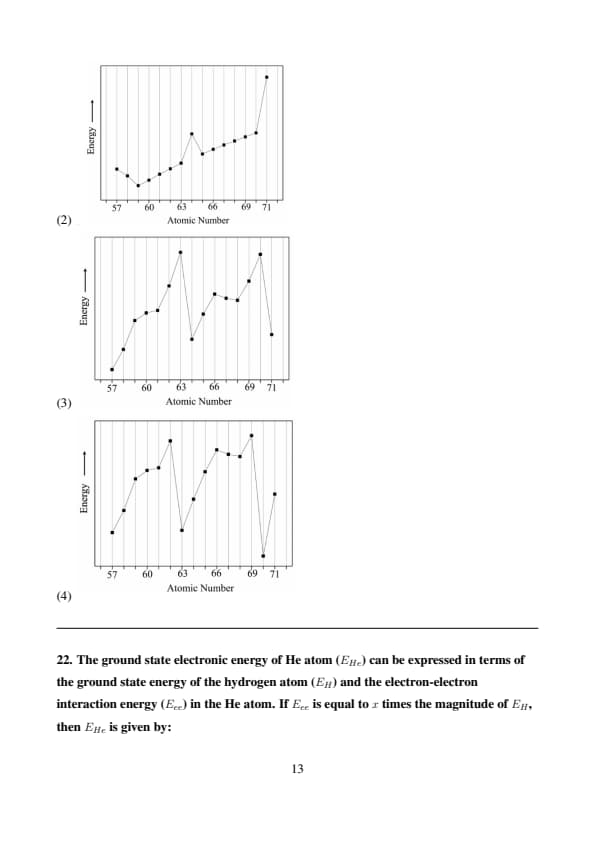

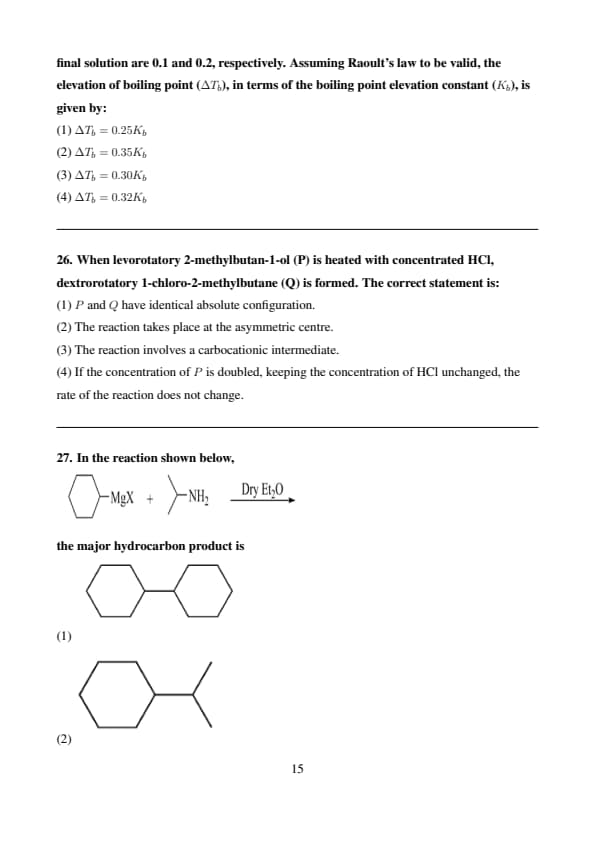
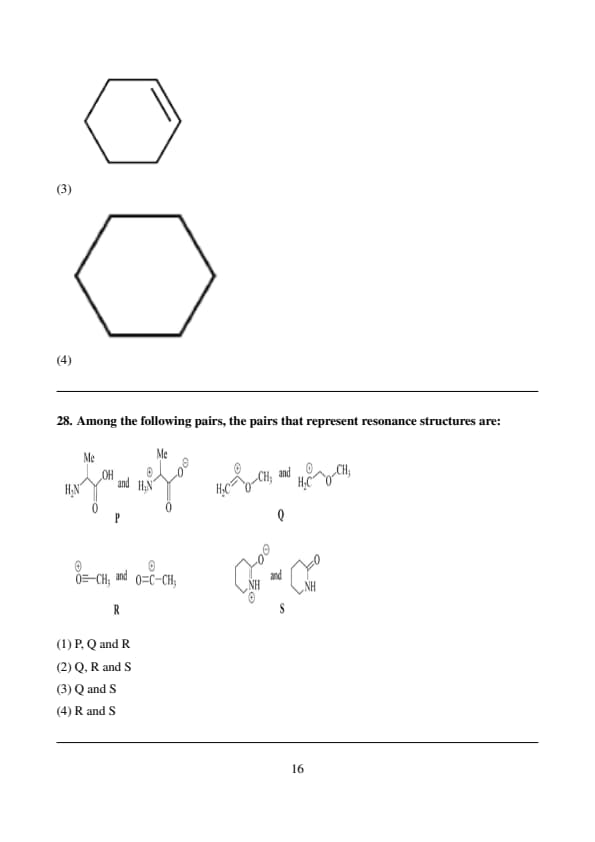
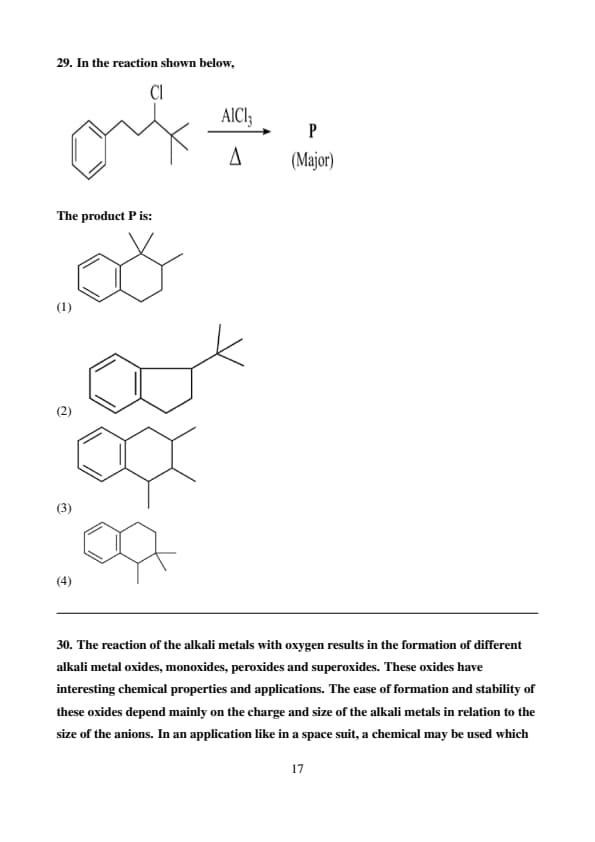
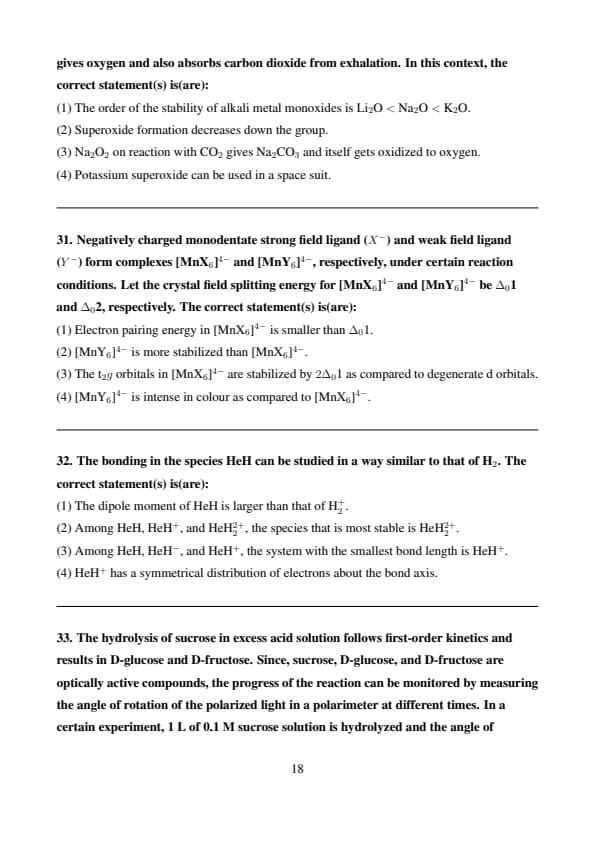
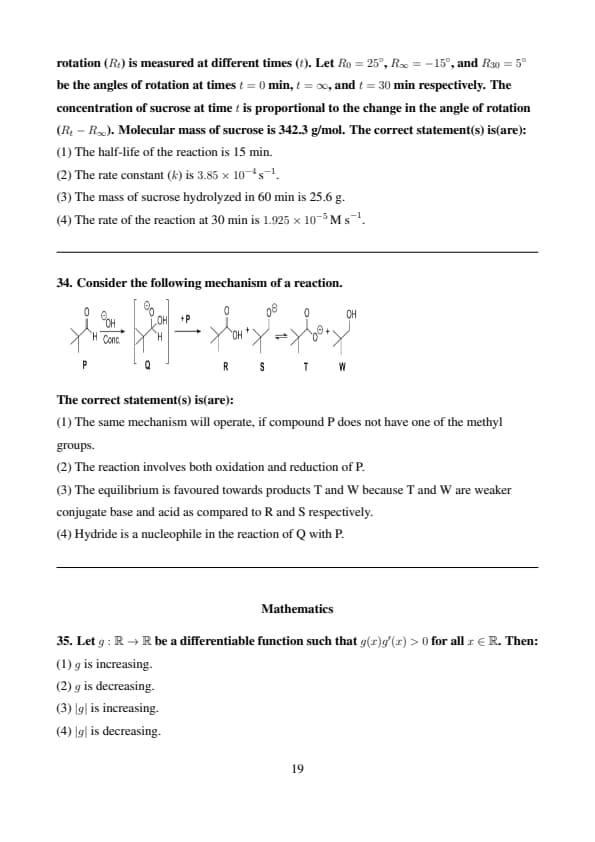
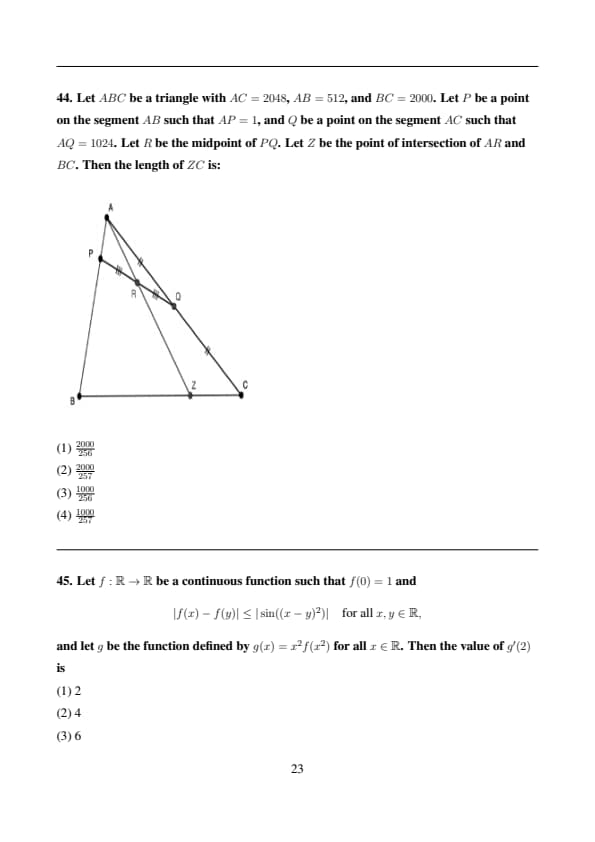
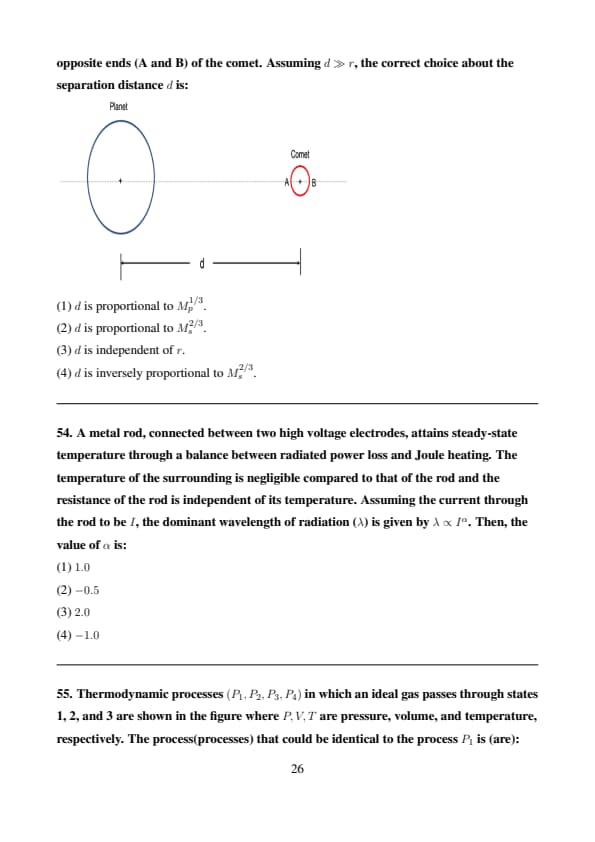
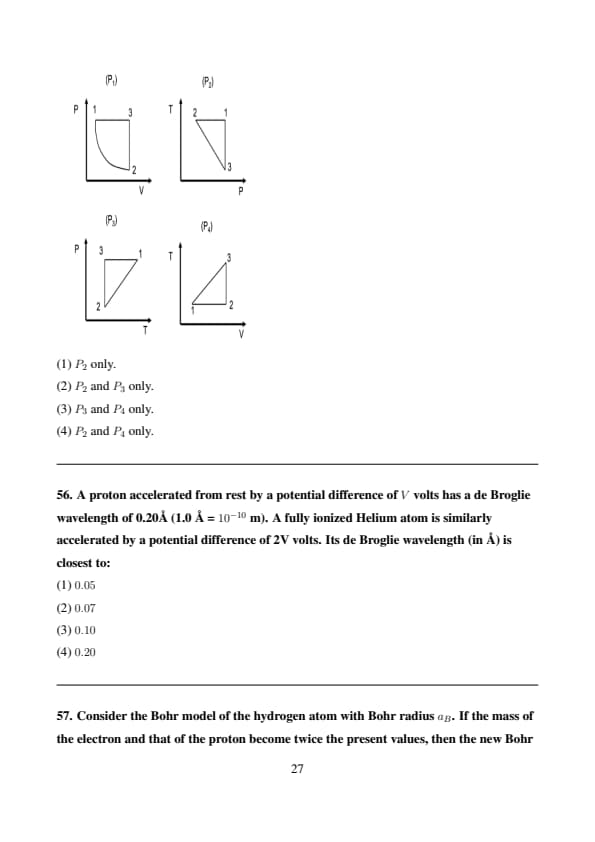
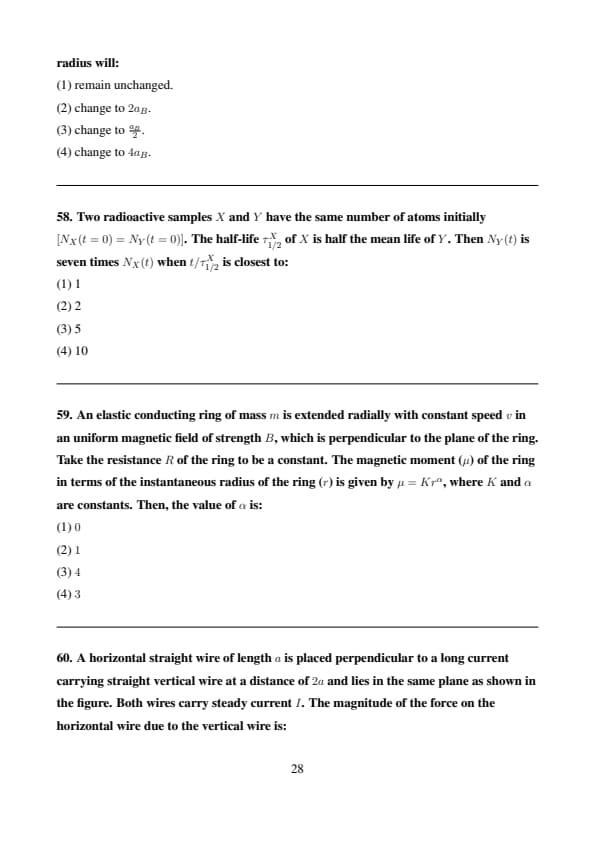
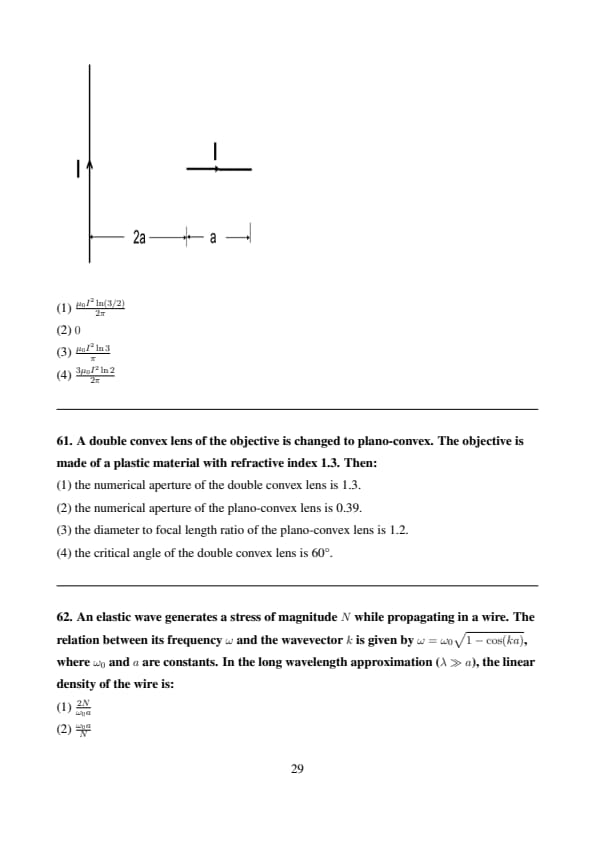
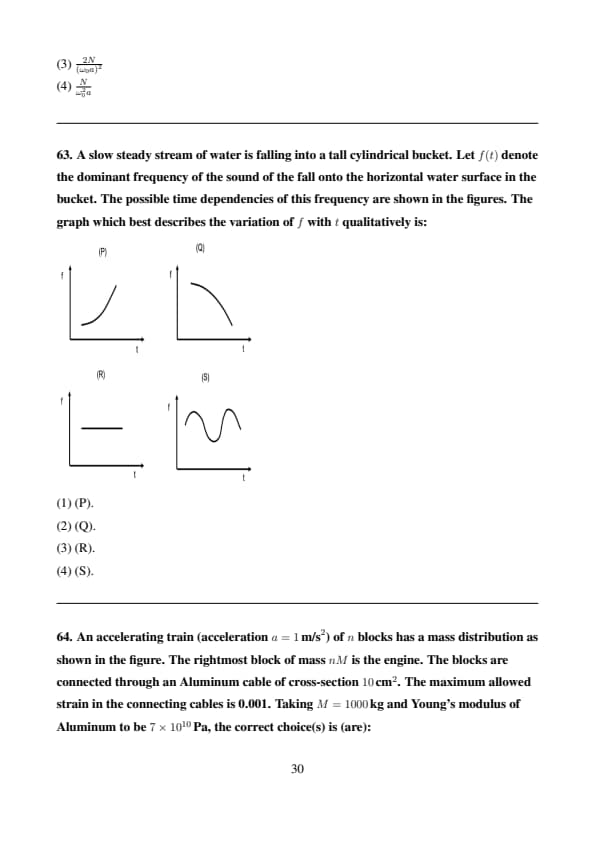
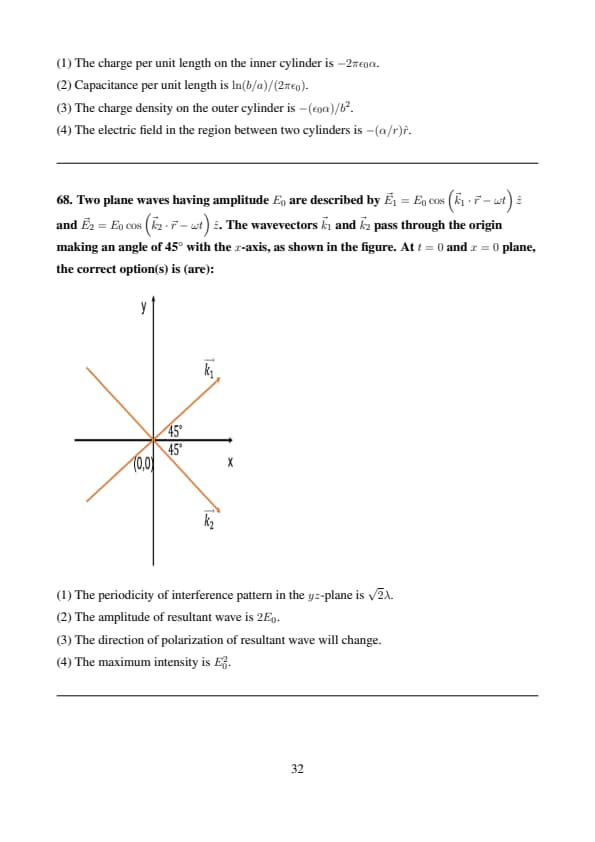


Comments